Appearance
Skip to content This page explains how Metaplay's user authentication and authorization works with the LiveOps Dashboard, and how to adopt this in your project.
Outdated
Dashboard authentication is being overhauled into something that doesn't require such in-depth configuration. As a result, most of this document is out of date and is left here only for reference. Please talk to us if you'd like to know more about user authentication on the dashboard.
Key Concepts
- A User is an individual who can access the LiveOps Dashboard.
- The HTTP API is a set of API endpoints on the Game Server that are called by the LiveOps Dashboard whenever a User wants to view information or perform an action.
- A Permission is a flag that allows specific features of the LiveOps Dashboard or the HTTP API to be used. A User can only access a feature if they have the relevant permission.
- A Role is a list of Permissions. Roles are assigned to Users.
- Authentication is the process by which a User logs into the LiveOps Dashboard. If Authentication is enabled then unauthenticated users cannot access any of the LiveOps Dashboard's features.
- Authorization is the process by which an Authenticated User can be granted or denied access to a certain feature. Authenticated Users are Authorized to access features based on their assigned Roles.
- Auth0 is a third-party company that Metaplay uses to manage Users, Roles, Authentication, and Authorization.
Quick Start
1. Create an Auth0 account
Go to https://auth0.com and signup for a free account. Use any region you want (it won't be accessed by your players) and use your game's name as the "tenant" as this will be a game-specific, rather than a company-specific, account.
2. Configure Auth0
Disable new user signup
By default Auth0 allows anyone to sign up as a new user in the tenant you just created, so you should go to the automatically created database connection settings and disable sign-ups. You can still create new users from the admin panel.


Create an application for Terraform automation
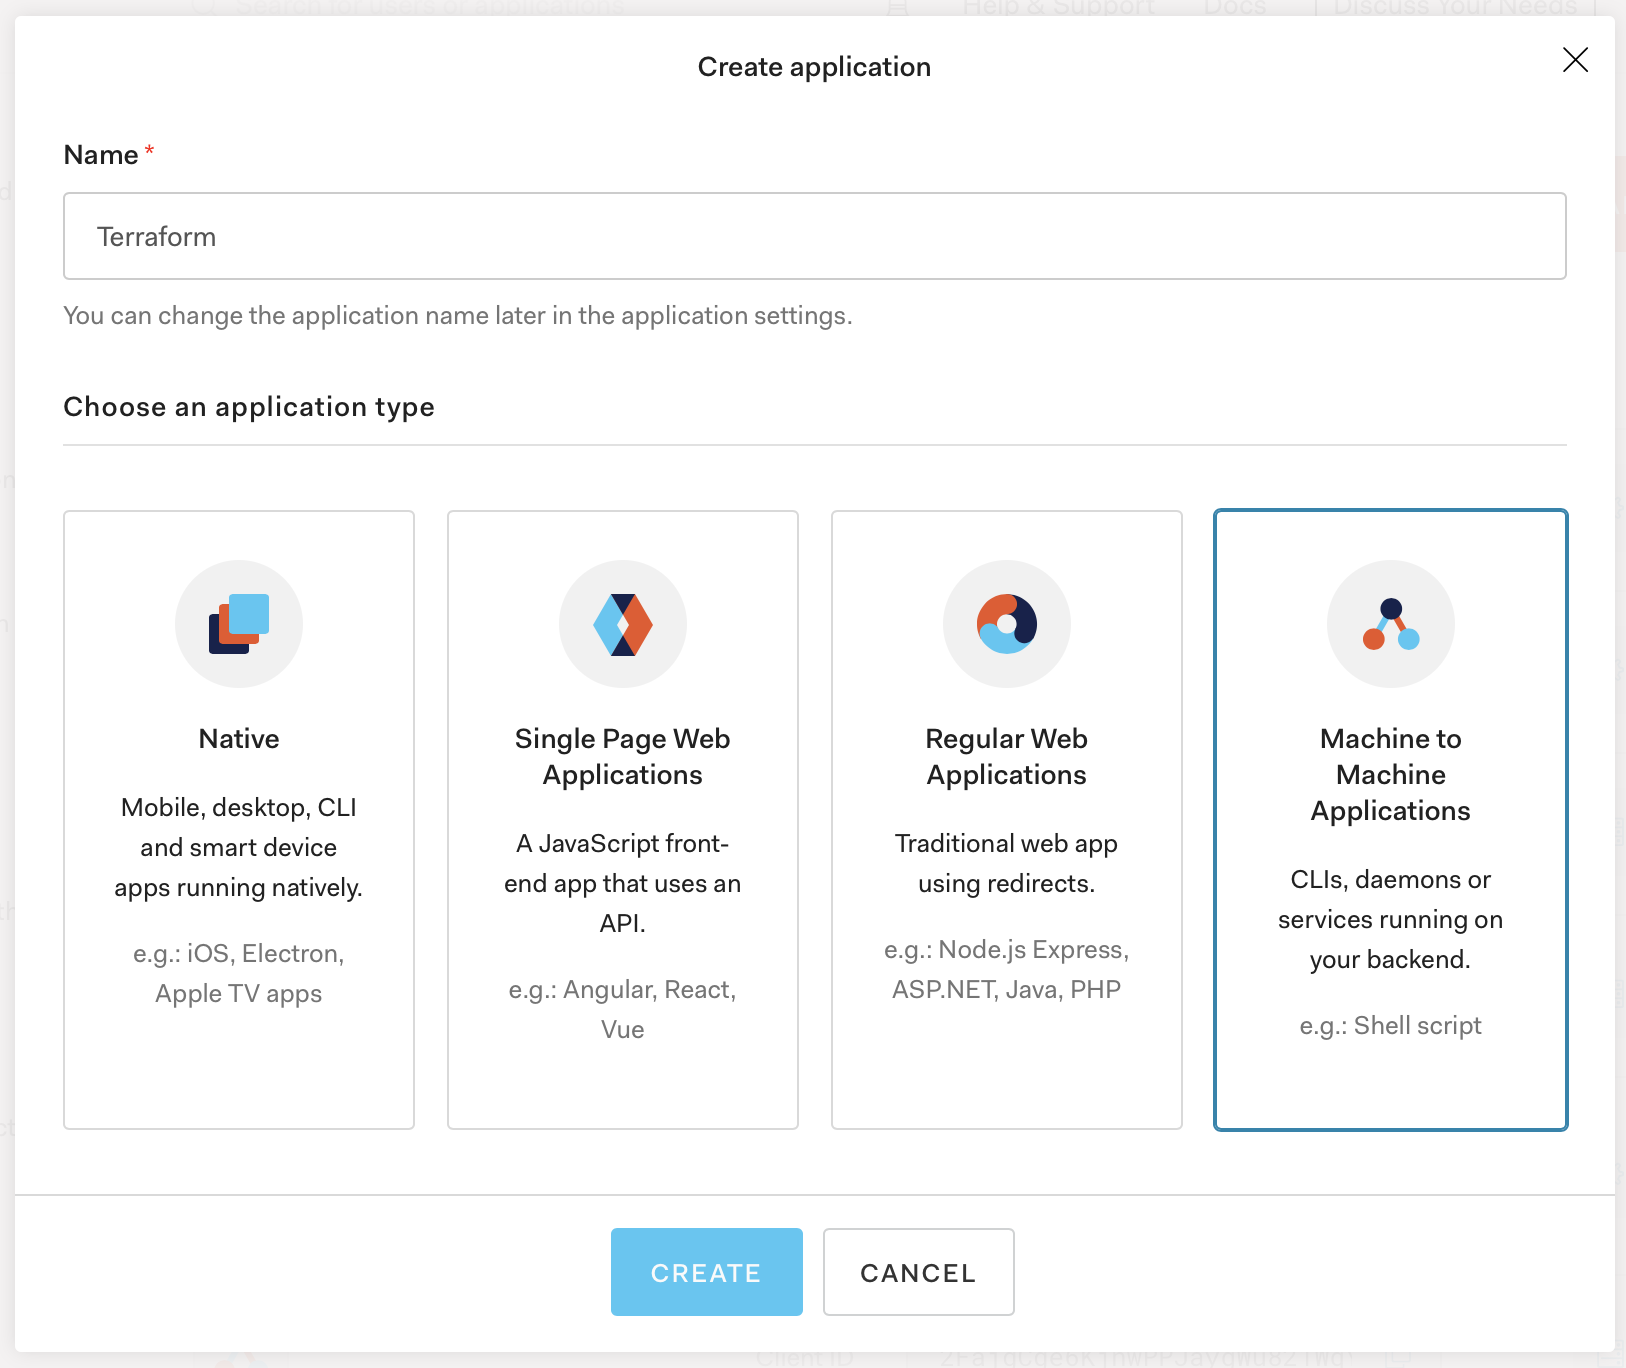
Next, to be able to use Terraform later to provision and manage Auth0 resources, you will need programmatic access to Auth0. This can be set up by creating a new Auth0 application of type Machine to Machine Application. It may be convenient to call the application Terraform to reduce the chances of confusion later on.
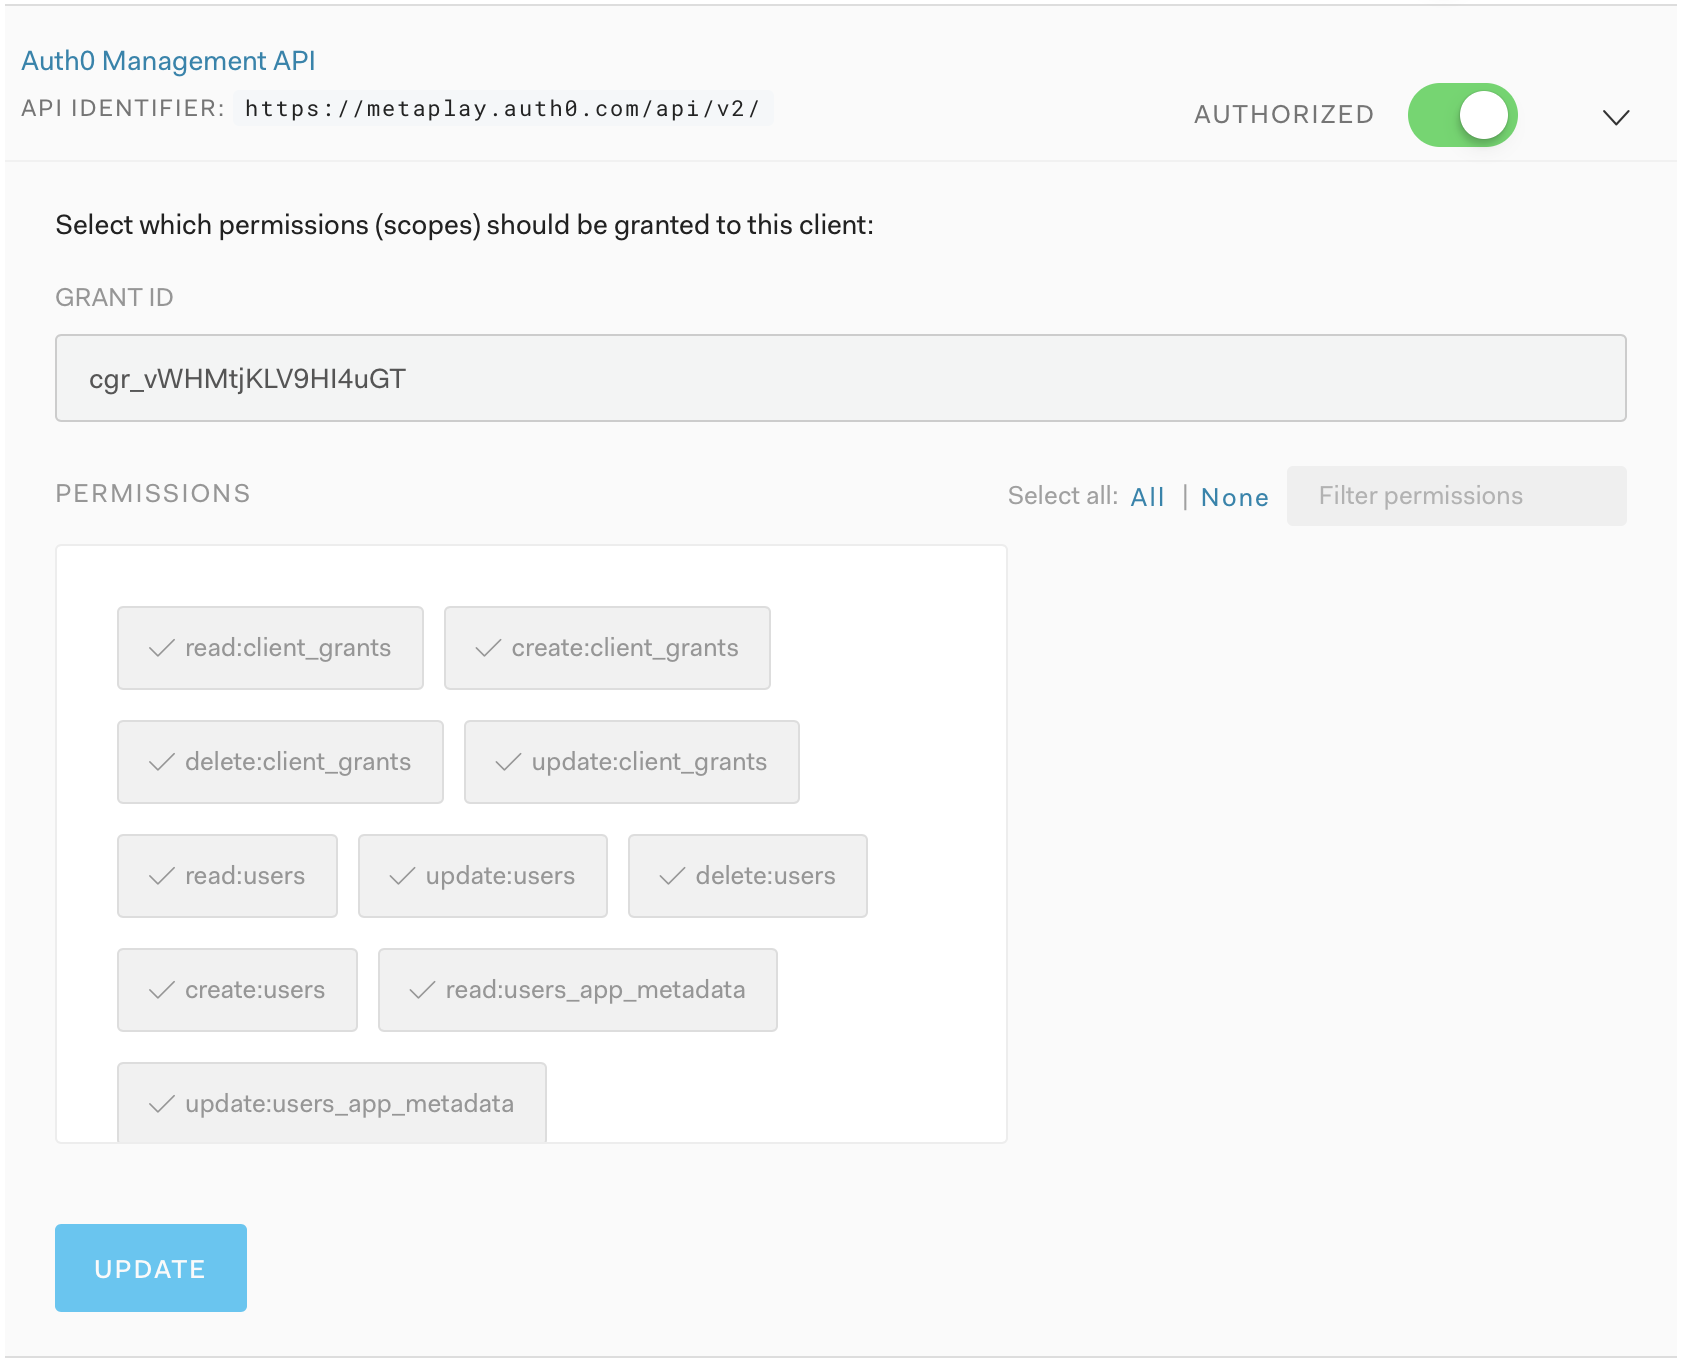
Once created, the Terraform Auth0 application will need to have the Auth0 Management API access granted to it. You can fine-tune the specific permissions granted, but to start with, it may be easiest to grant permissions liberally.
Finally, you should note the domain, client id and client secret for the Terraform Auth0 application as you will need them later when interacting with the Auth0 APIs. These values should be considered sensitive in nature, so appropriate care should be taken in protecting them.
Customize your login page
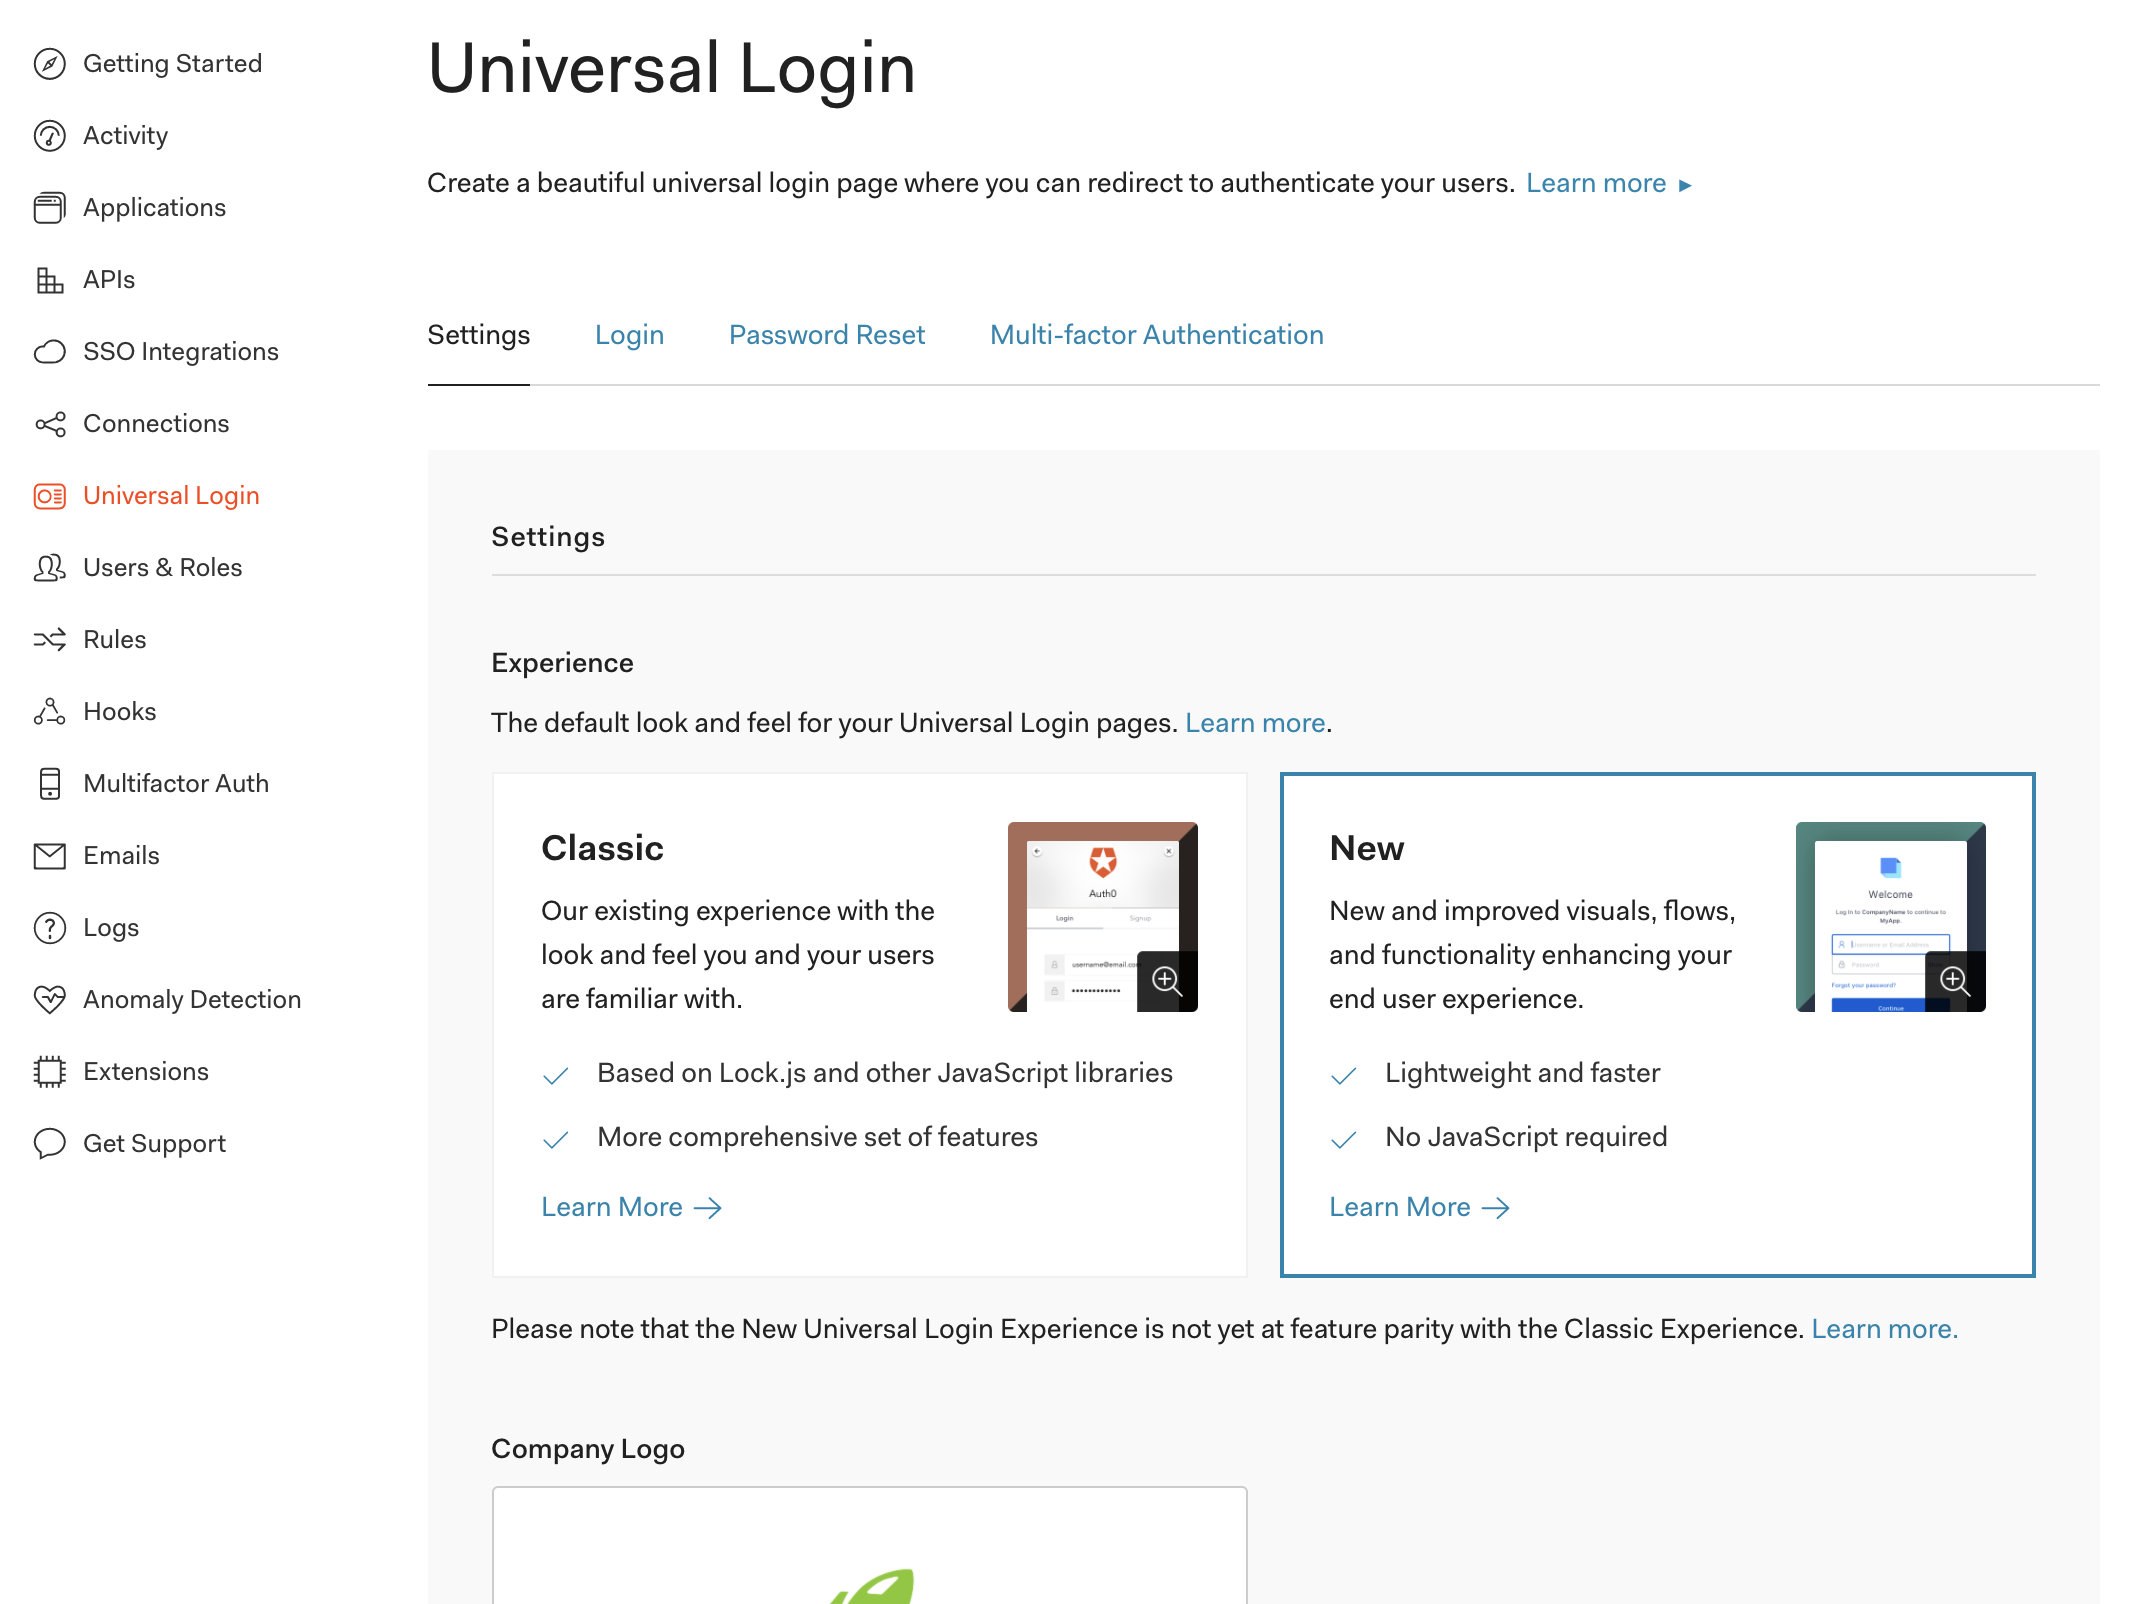
If you like, there's quite a bit of configuration that can be done in Auth0 that makes it feel like an extension of your game rather than an external service. You can do this through the Universal Login tab on the Auth0 dashboard. We recommend that you access this tab and switch to the New Universal Login Experience to get a nicer-looking and better-performing login page for your users.
Pro tip
You can also explore more advanced features like social logins to avoid creating manual user accounts for your developers.
3. Managing your Auth0 resources through Terraform
INFO
Not sure what's going on here? Start with the Deploying Infrastructure page for getting your initial infrastructure stack going!
For managing Auth0 resources, we provide a reference Terraform project under the infra-skel repository, which allows you to manage your game server and infrastructure Auth0 configurations, as well as deploy any machine accounts that you may need.
DANGER
The below example configures the Auth0 domain and credentials as Terraform variables for the sake of simplicity. Please never write your secrets into the Terraform code itself and instead follow the appropriate measures described in Terraform Auth0 provider environment variables.
To get started, you can clone the infra-skel/auth0 project as a starting point. In this case, you need to only edit the terraform.tfvars file with your values. For example:
jsx
# infra-skel/auth0/terraform.tfvars

organization = "YOUR_ORGANIZATION"
auth0_domain = "YOUR_AUTH0_DOMAIN"

stacks = {
  "your.stack.tld": {
    "domain": "your.stack.tld"
    "deployments": {
      "GAME_NAME_HERE-prod": {
        "name": "GAME_NAME_HERE-prod"
        "subdomain": "GAME_NAME_HERE-prod" # subdomain + domain must point to the correct game server endpoint that you have defined in your game server Helm values
        "roles": [
          "customer-support-agent",
          "customer-support-senior",
          "game-admin",
          "game-viewer",
        ]
      }
    }
  }
}
The above basic configuration, combined with the Terraform project, will create the Auth0 resources for handling authentication for the game server as well as the infrastructure stack's services. Please refer to the repository's README for further details.
You can deploy the resources as a regular Terraform project:
shell
export AUTH0_CLIENT_ID="YOUR_AUTH0_CLIENT_ID"
export AUTH0_CLIENT_SECRET="YOUR_AUTH0_CLIENT_SECRET"
export AWS_PROFILE="YOUR_AWS_PROFILE"
terraform init
terraform apply
After running Terraform apply, you can log into your Auth0 account and obtain the client ID, client secret, and audience. You will need these when configuring the authentication values in your game server's Helm values (see details at the metaplay-gameserver README).
Optional: Add SSO Configuration for Easy Logins
If you wish to connect an identity provider like Google as a federated identity source, you can use the google_sso variable in the infra-skel/auth0 project and configure it with your Google SSO client (follow the Auth0 guide for connecting apps to Google to create the Google side configurations).
yaml
# infra-skel/auth0/terraform.tfvars

google_sso = {
  client_id     = "GOOGLE CLIENT ID"
  client_secret = "GOOGLE CLIENT SECRET"
}
Deploying the Terraform project again will create an Auth0 connection to Google and enable Google SSO for all game server and infrastructure authentication managed by the project.
For other SSO providers, you can follow the Google SSO example in the infra-skel/auth0 project and adjust the auth0_connection resource accordingly to support other vendors (see the resource documentation for more details).
4. Create a User and Assign a Role
Now everything is set up and connected, but (unless you setup SSO in the optional step above) you still need to create a User inside your Auth0 account to be able to login. The easiest way to do this is via the Auth0 users page.
After creating your User, you should also assign a Role to it that grants Permissions to the LiveOps Dashboard, such as the "Game Admin" Role.
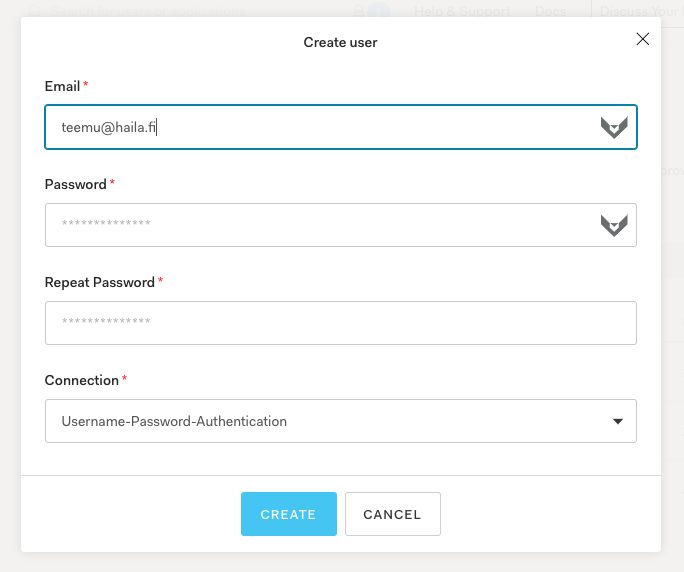
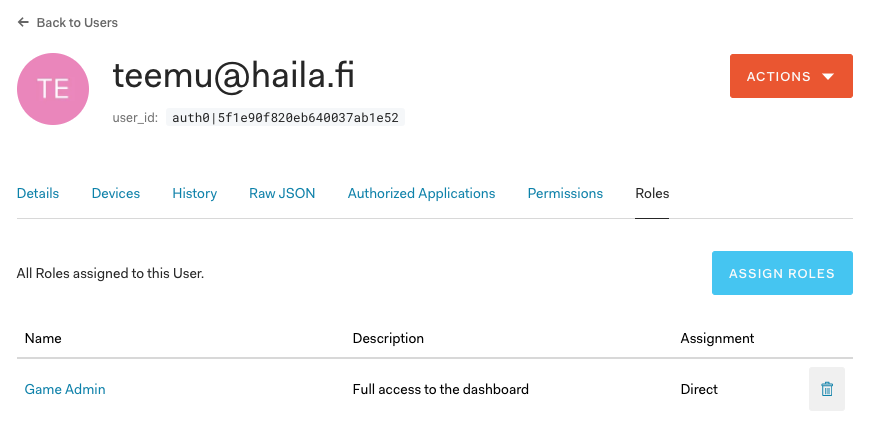
That's it! You should now be able to login to your LiveOps Dashboard of your Metaplay Deployment with the User you just created. Feel free to experiment with the different roles to see how they enable and disable different LiveOps Dashboard features!
How It All Works
Metaplay provides user Authentication and Authorization (hereafter referred to collectively as Auth) for the LiveOps Dashboard and HTTP API. User management and auth are implemented using industry-standard techniques provided by a third-party company, Auth0. By utilizing an external partner, we ensure that you have end-to-end ownership of the entire process - Metaplay itself does not require any access to your Auth system or your Users.
Metaplay's Auth system allows you to add Users and define what level of access they have to your game's LiveOps Dashboard. Typically you will achieve this by assigning each User a single, pre-defined Role, such as Customer Support Agent or Game Admin.
Auth can easily be configured, activated, and deployed as required. When Auth is turned off, we simulate authorization under the hood, but we assign a default Role to each and every User. This default role is configurable in your Game Servers configuration files. You might typically begin your game's development with auth turned off, and then enable it when you need to start working with a customer support team.
Security first
When running in a local environment, Auth is turned off by default, meaning that all users will be given a default role without needing to authenticate first. In a cloud environment, Auth is completely disabled by default - and this will prevent your server from starting! This might seem like an odd choice, but we do it so that if you make a mistake in your Game Servers configuration the server won’t accidentally start with LiveOps Dashboard in a state where it is accessible to anyone. If Auth was turned off by default, then any configuration mistakes could accidentally give Admin permissions to anyone who can access the LiveOps Dashboard! Auth is so important that we need to make a conscious choice about whether to enable it or not.
Pro tip
We are only concerned with access to the LiveOps Dashboard and the HTTP API in this guide. These systems are intended for use by many different types of Users, such as internal or external customer support agents. Other systems that are accessible only to your network admins, such as your Game Servers and your databases use different auth systems and are covered separately.
Managing Users
One of the big benefits of the Auth0 integration is that you can use it to manage all your user accounts outside of the individual Metaplay Deployments. The easiest way to add new users to Auth0 is via their admin panel:

By default new users do not have any roles, so they basically have read-only access to the LiveOps Dashboard landing page and other resources.
Pro tip
You can configure Auth0 with social logins to avoid creating individual accounts by hand! You can also use Auth0 as the SSO identity provider to, for example, grant registered users automatic access to your customer support tools or analytics.
Limiting Access with Permissions
Permissions grant access to LiveOps Dashboard actions or features. One Permission may allow you to view a player's details while another may allow you to send in-game mail to a player. Permissions are granted to Users to allow them to access individual features.
Good to know
Whilst we talk about Permissions, you might also see documentation or discussions on auth that talk about Scopes. As far as we are concerned here, these are two sides of the same coin - Scopes define what features are available and Permissions are granted to Users to enable them to access those features. For the purpose of auth within the context of Metaplay, we will only talk about Permissions.
Permissions are validated in several places:
- The LiveOps Dashboard uses Permissions to decide which features a User can access. Sometimes a button may appear greyed out in the LiveOps Dashboard, indicating that the current User does not have the required permission to perform the action. Other times, entire pages or features may be greyed out. Whenever you see a button or page that is disabled in this way, you can float your mouse cursor over the feature to see a tooltip that describes the required Permission.
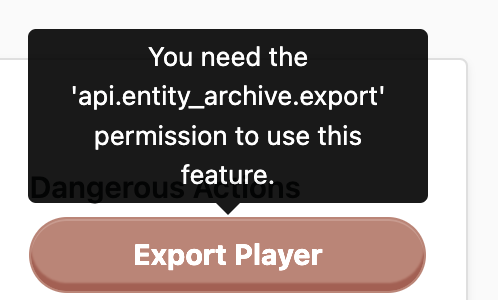
- The HTTP API uses Permissions to decide whether an endpoint can be called or not. When the LiveOps Dashboard authenticates a User it receives a signed token from the authentication server. The LiveOps Dashboard sends this token along with every call to the HTTP API. The HTTP API validates the token by verifying its signature, then checks the contents to decide whether the User can call the requested endpoint or not. If the User lacks the proper permission, the request is blocked. Even if a malicious User manages to bypass the LiveOps Dashboard Permission checking, they will not be able to call HTTP API endpoints that they do not have permission to use.
- Inside the Game Server code, each HTTP API endpoint can be tagged with the Permission required to activate it. By default, we add fine-grained Permissions to nearly all API endpoints in the Game Server. This ensures that we can control exactly which Users can perform which actions. We only leave a couple of endpoints un-protected by Permissions - just enough that the Dashboard can query basic information about the Game Server, such as how to authenticate a User.
Note that we don't assign Permissions directly to users, instead we group a set of them together and assign those groups to the user. Which brings us to:
User Roles
Roles are simply a list of Permissions. When a Role is assigned to a User, that User automatically gains all of the Permissions of that Role. If the Role is removed from the User, so are the Permissions.
Metaplay ships with a few pre-defined Roles for each of your deployments:
- Game Admin - Full access to the dashboard.
- Game Viewer - View access to everything in the Dashboard.
- Customer Support Senior - Has access to manage individual players, but cannot make changes to the game server.
- Customer Support Agent - Similar to Customer Support Senior, but is unable to make drastic changes to players and access some additional types of player data.
If you want to define a different set of roles, you can do this in your game server’s runtime options. It most likely makes sense to configure this inside the base options file: Options.base.yaml. Inside the Authentication section you can define your roles with:
yaml
## Authentication

Authentication:
  Roles:
    # Choose which built-in roles are enabled for the game.
    # You'll always need to enable at least game-admin here.
    - game-admin
    # Specify a game-specific example role
    - my-custom-role
  Permissions:
    ...define all permissions?
Pro tip
A User can have multiple Roles assigned to them, and they will gain Permissions from all attached Roles. You could choose to define Roles on a more granular level than we have, eg: one Role to view players, one to edit players with non-destructive actions, and another for destructive player actions. You would then assign sets of Roles to Users based on their required capabilities. We believe that it is best to manage Users by having a few well-defined Roles, and then applying a single Role to each User. This is how we have configured the Roles to work by default.
Development and Testing with Permissions
We won't talk about how to add Permissions to your code, that's covered by Working with the LiveOps Dashboard HTTP API, but we will talk a little about a powerful feature that helps you to check that your Roles and Permissions are correctly configured: the Assume Roles feature.
Assuming Roles
Earlier in this document we discussed how, when Auth is disabled, every User gets given a default role. You can easily use this to test that your Roles and Permissions are correctly configured by running the Game Server locally with Auth disabled. You can then use the Assume Roles feature to pretend that your User has different Roles than the default value.
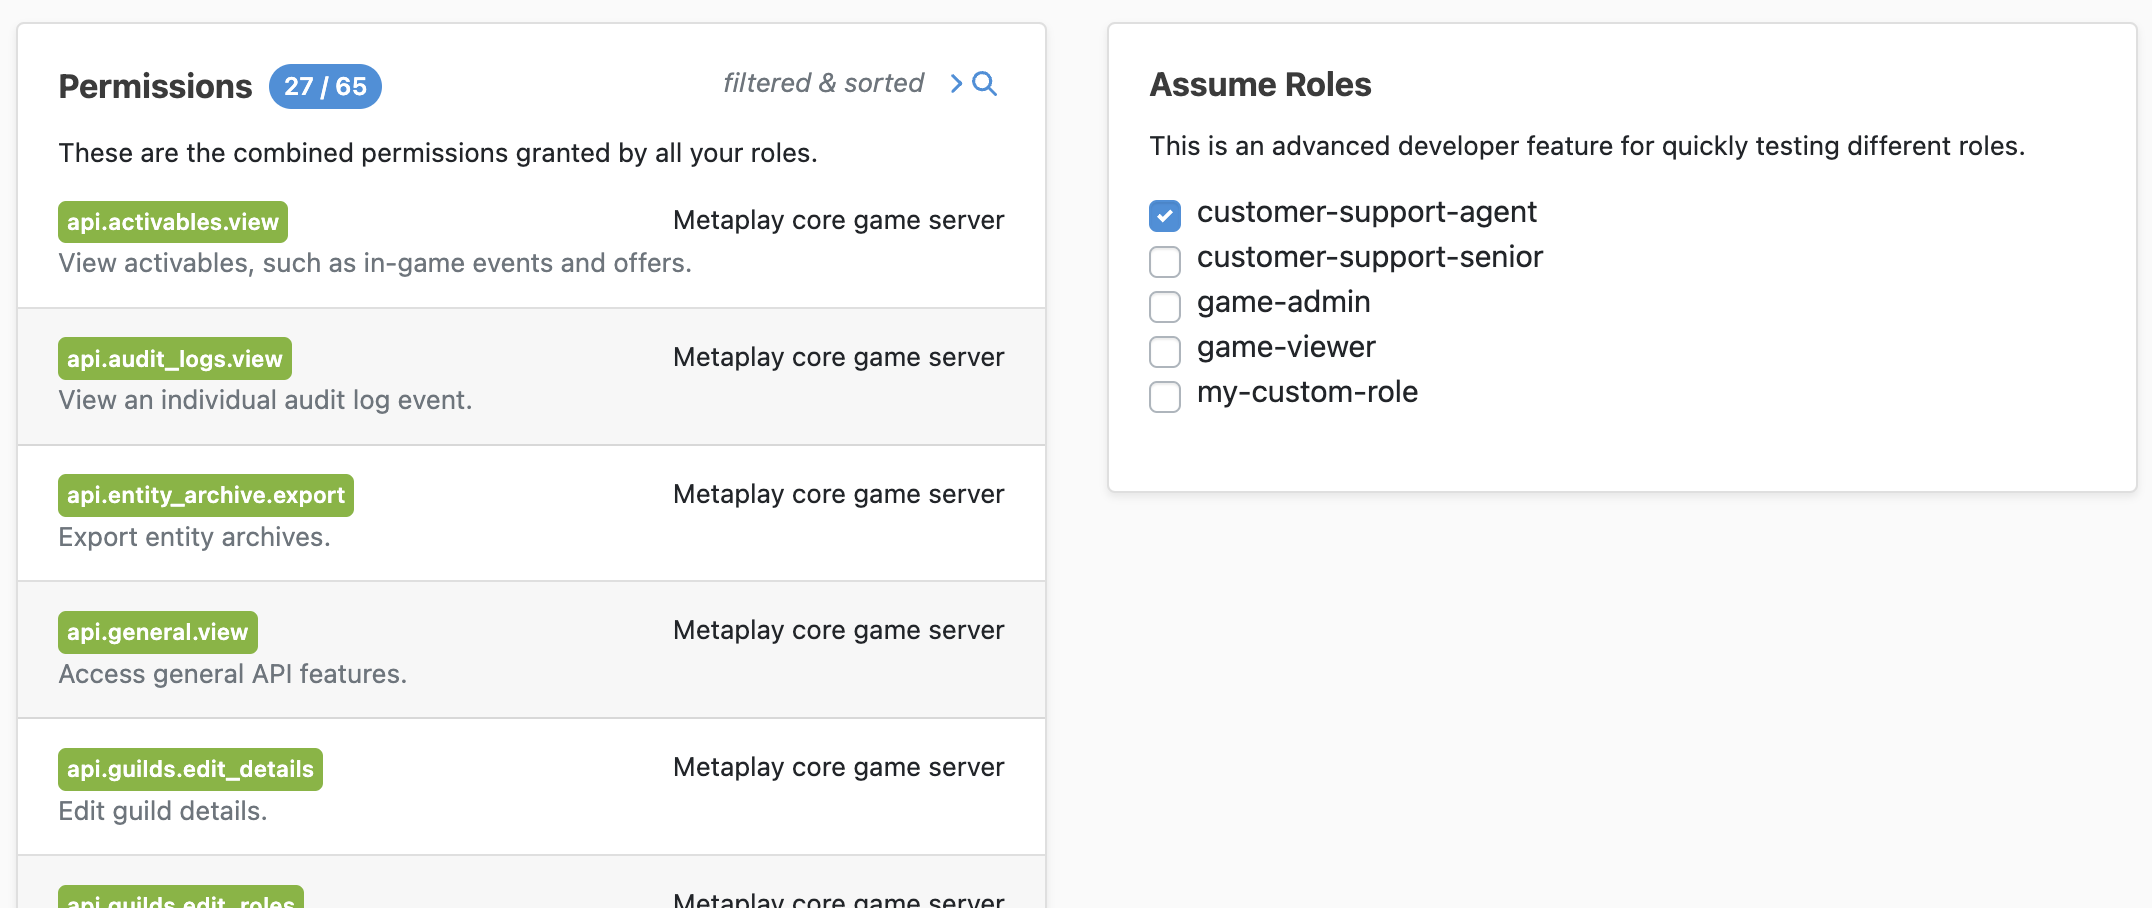
The Assume Role feature can be found on the user profile page, which can be accessed by clicking on your username in the top right corner of any page on the LiveOps Dashboard.
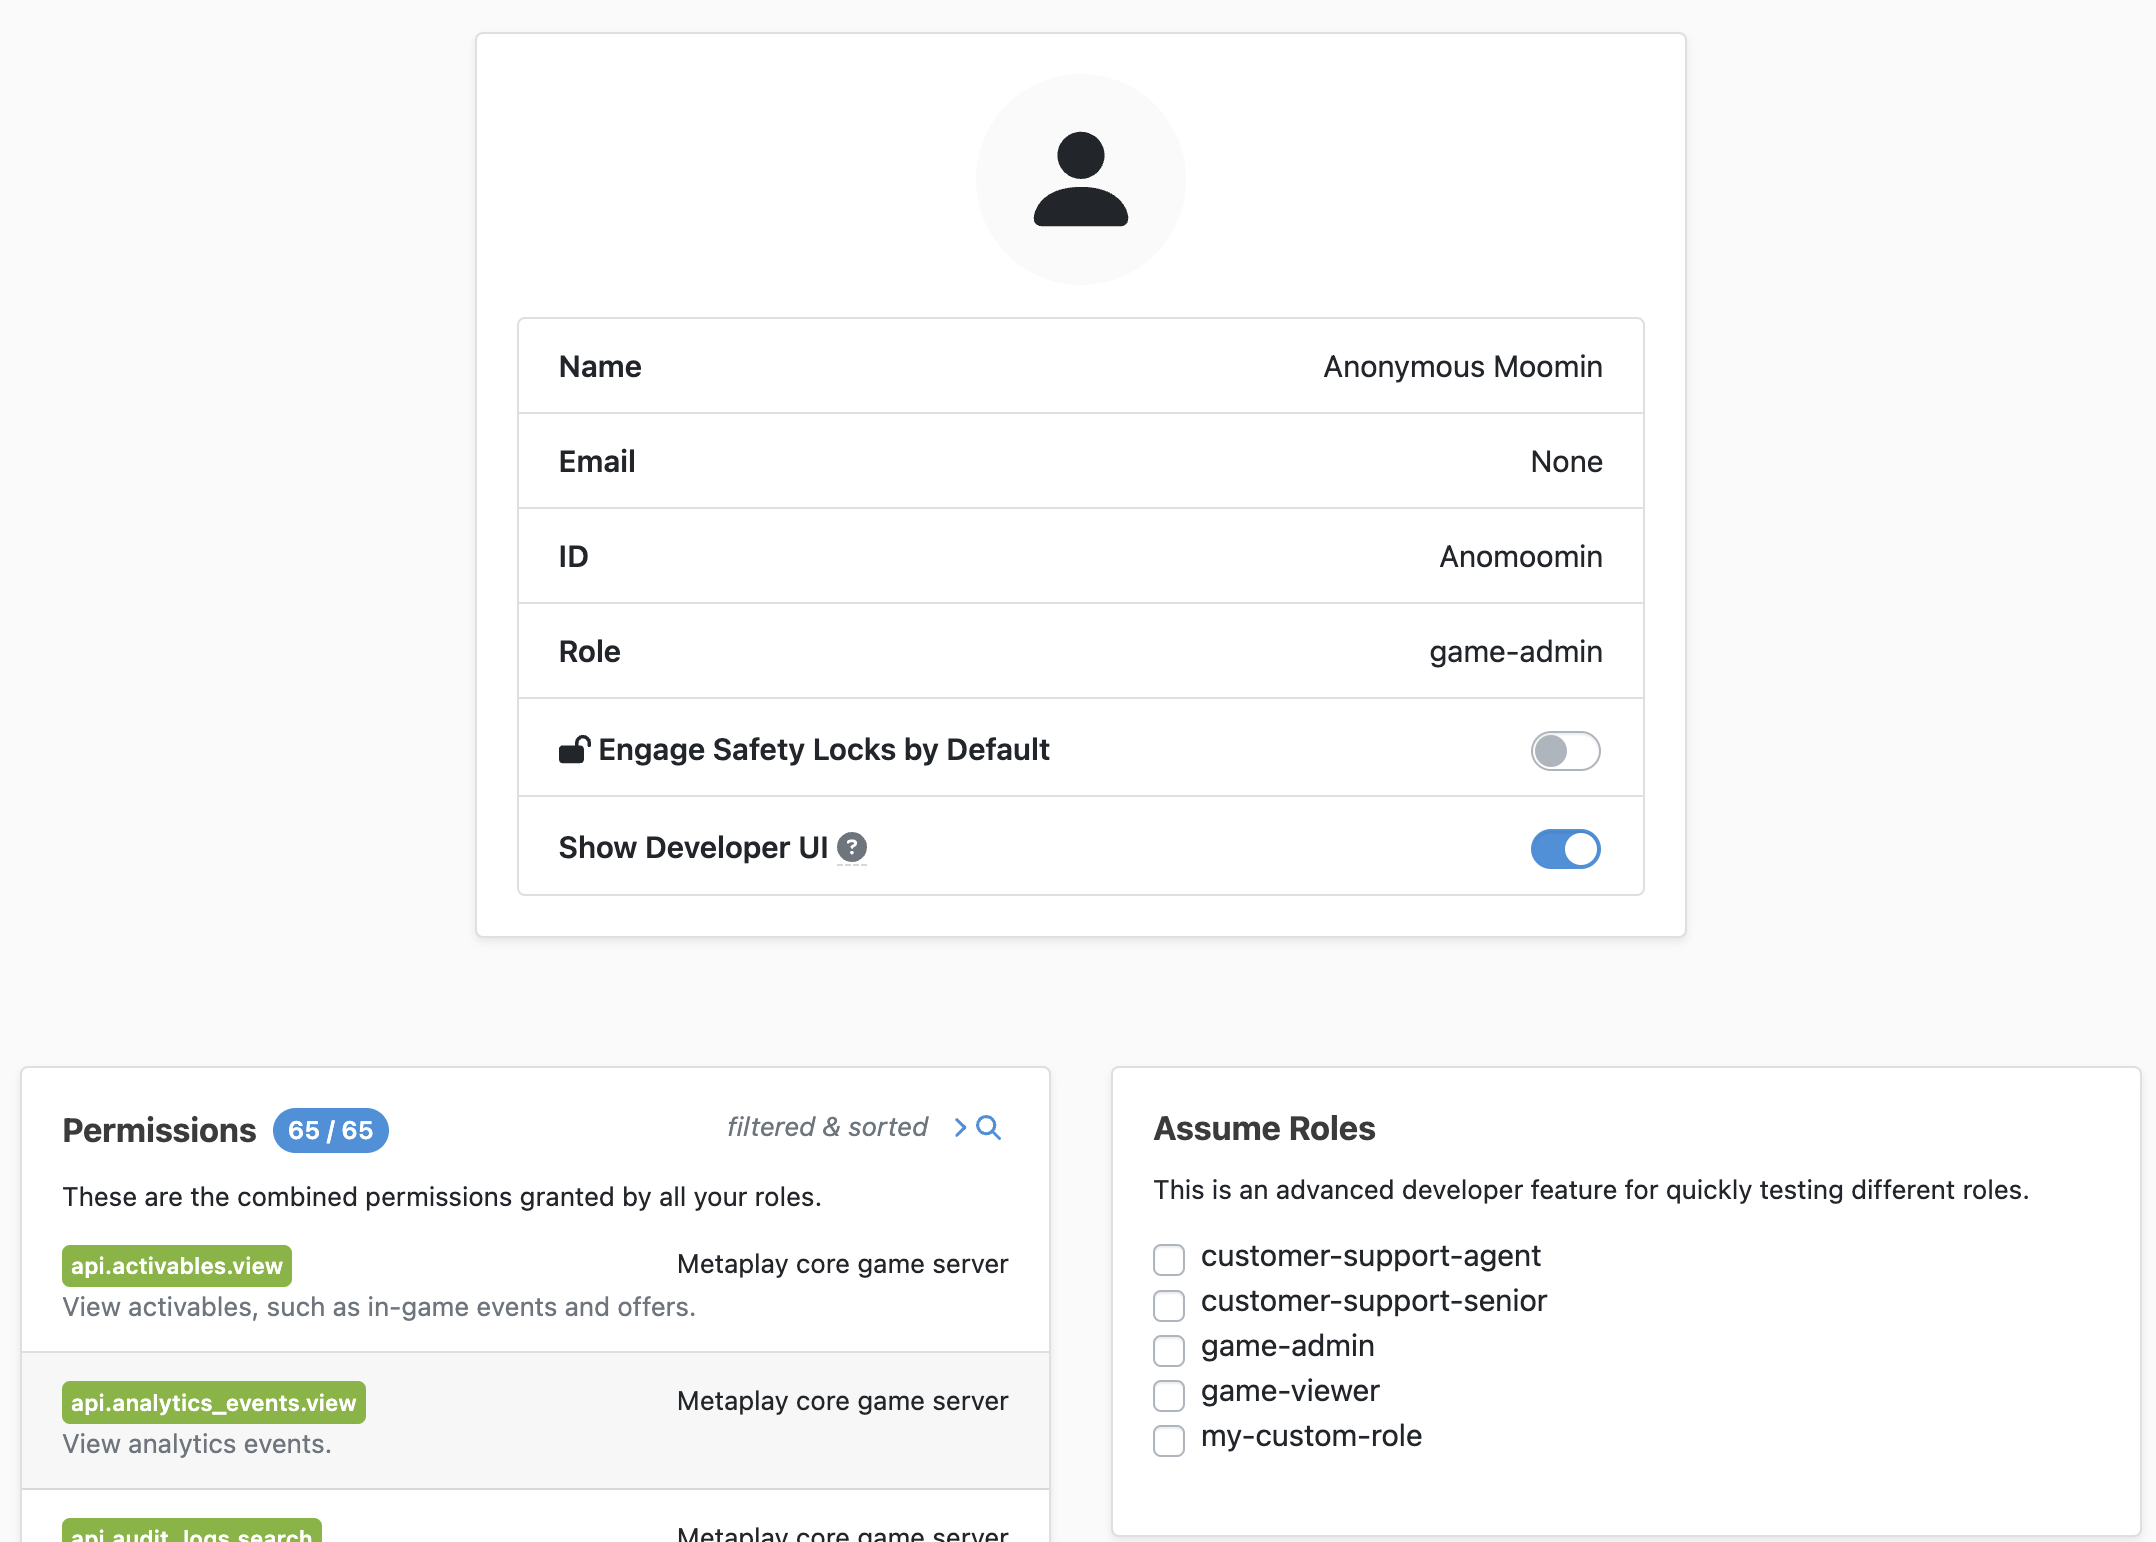
To assume a different Role, tick the box next to its name in the Assume Roles box. If you tick multiple boxes then you gain the combined permissions of all selected roles. When this feature is active, it will be clearly indicated on the sidebar of every page in the LiveOps Dashboard.
Security first
The Assume Role is great for development and testing, but it's also a potential security hole that could be abused. For this reason, the feature is only available when _Auth_** is turned off**. When Auth is turned on, the Assume Role code is completely removed from the Game Server's authentication and authorization code paths and there is no way for Users to change, spoof or assume their Roles.
Pro tip
The Assume Roles feature works by adding a special HTTP header field to each API request. The value of this header is remembered per browser tab, not globally. This means that you can test a Role in your browser without affecting anyone else - or you can use it to see how the LiveOps Dashboard would look to different Users by assuming different Roles in multiple different tabs.
Infrastructure and Deployment
Managing Auth0 through Terraform
While it's possible to manage Auth0 by hand, we strongly recommend using Terraform to manage it for all of your deployments. Terraform connects to Auth0 via a machine-to-machine application you will have to setup by hand.
We provide an end-to-end example of how to manage Auth0 with our infra-skel repository's auth0 project. The project README has a detailed example of how to use the project.
Configuring your game server deployments for authentication and authorization
Once your game server is ready to authenticate and authorize Users against Permissions on the API level, the functionality needs to be enabled for the Game Server. You do this in the Game Server configuration, which can be managed via https://github.com/metaplay-shared/helm-charts/blob/metaplay-gameserver/README.md.
INFO
Metaplay game server configuration values can be provided as environment variables by prefixing the option name with Metaplay_. For example, Authentication.Enabled can be set with the Metaplay_Authentication__Enabled environment variable.
For self-managed infrastructure stacks where you manage the setups through Terraform, you can benefit from the previously mentioned Auth0 Terraform modules and configure your infrastructure Terraform code to not only take care of managing the Auth0 configurations, but you can also pass values from those modules to your infrastructure stack and define the game server configurations for authentication and authorization this way. The Working with the LiveOps Dashboard HTTP API page contains an example of configuring your infrastructure this way.
