Appearance
Connecting to the Game Server
This article will guide you through running a Metaplay server locally and connecting to it.
Appearance
This article will guide you through running a Metaplay server locally and connecting to it.
If you followed the previous guide, your project now contains a fully-featured game server under the Backend/ directory that you can easily run and connect to on your local machine. Now you're ready to configure your project's identity accordingly and run the server for the first time.
You can run the game server locally using the CLI:
MyProject$ metaplay dev serverPress q to gracefully stop the server.
Initializing the Metaplay SDK in your project will create Visual Studio solution file called <project>-Server.sln in your project's Backend folder. The server executable project is Server.csproj inside Backend/Server.
You can run the server locally simply by running/debugging the server project in your chosen IDE.
It's good to note that killing the process outright can lead to some data loss. You can press q or Ctrl+C (or Command + C on Mac) to stop the server gracefully.
Check it out!
You can now view the LiveOps Dashboard at http://localhost:5550 when the server is running.
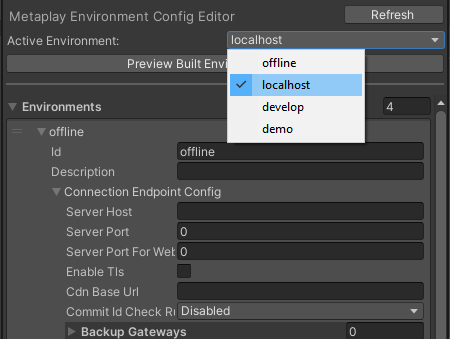
With the game server running, we can connect the game client to it in Unity. Open the environment configs editor under Metaplay/Environment Configs and set 'Active Environment' to 'localhost'.

Hitting play will now form a connection to your locally running game server.
Great! We've now got a server running. To continue with the basics, you should start understanding how Metaplay’s programming model works so you can prepare yourself and start working on your game. We recommend you stop by Saving Player Data to the Server to get started.
You might also want to take a detour by Working with Runtime Options to learn more about configuring the server for different environments or Introduction to the LiveOps Dashboard to get a primer on one of the most useful features the SDK has to offer.
If you want to deploy your game server to the cloud, see Getting Started with Cloud Deployments.