Appearance
Working with the LiveOps Dashboard HTTP API
This guide walks you through implementing a new end-to-end feature into the LiveOps Dashboard.
Appearance
This guide walks you through implementing a new end-to-end feature into the LiveOps Dashboard.
In this guide, we will give an example of the end-to-end process of adding a new feature to the LiveOps Dashboard. The dashboard will call an HTTP API endpoint on the game server, and only users with the correct Authorization will be allowed to activate it.
The feature we will add is a simple one: a new button on the dashboard which causes the game server to output a log message.
To achieve this, we will make changes in the following places:
First, we will add a new HTTP API endpoint to the game server and test it.
We need to add some code to handle calls to the API endpoint. Inside your project, create a file called Backend/Server/AdminApi/Controllers/LogController.cs and add the following code to it:
using Akka.Actor;
using Metaplay.Core.Model;
using Metaplay.Server.AdminApi.AuditLog;
using Metaplay.Server.AdminApi.Controllers;
using Microsoft.AspNetCore.Authorization;
using Microsoft.AspNetCore.Mvc;
using Microsoft.Extensions.Logging;
using System.Threading.Tasks;

namespace Game.Server.AdminApi.Controllers
{
  // Deriving from GameAdminApiController means that the endpoint will
  // automatically be located under the URL path '/api'. This will be
  // combined with the path in the HttpGet attribute below to form the
  // full path '/api/logTest'
  public class LogController : GameAdminApiController
  {
      /// <summary>
      /// Example API return type. Strongly-typed return values should be preferred.
      /// </summary>
      public class LogTestResponse
      {
        public required string DummyValue { get; init; }
      }

      /// <summary>
      /// Example API endpoint. The return values should be wrapped in a <see cref="ActionResult{TValue}"/>.
      /// </summary>
      [HttpGet("logTest")] // This attribute defines the URL and type of this endpoint.
      [RequirePermission(MetaplayPermissions.Anyone)] // Allow anyone with access to the dashboard to invoke this endpoint.
      public async Task<ActionResult<LogTestResponse>> GetLogTest()
      {
        // Log a message to show that we successfully invoked this endpoint.
        _logger.LogInformation($"{Request.Method} request to {Request.Path}");

        return new LogTestResponse { DummyValue = "Some Value" };
      }
  }
}If you now run the server you will have a new endpoint, http://localhost:5550/api/logTest. If you visit this address from your browser you'll see a line in your game server log similar to:
[XX:XX:XX.XXX INF Game.Server.AdminApi.Controllers.LogController] GET request to /api/logTestNext, we'll add some UI elements to the dashboard to send a request to the new endpoint.
For the sake of keeping this guide simple, we are just going to add a button to the System page of the dashboard that performs an HTTP GET request call to invoke the endpoint we just added. In your dashboard source folder, create a new component /src/MessageLogButton.vue and add this code to define the button:
<template lang="pug">
  div
    //- A card containing some text and a button.
    MCard(title="My Cool New Feature" class="tw-mt-3")
      p This is my cool new feature! Press the button to trigger a log message on the server.
      div(class="tw-float-end")
        MButton(@click="triggerLogMessage" variant="primary") Trigger Log Message
</template>
In the same file, in the script block, add a function to handle the button click:
<script lang="ts" setup>
import { useGameServerApi } from '@metaplay/game-server-api'
import { MButton, MCard, useNotifications } from '@metaplay/meta-ui-next' // Components from our Metaplay UI Component Library.

const gameServerApi = useGameServerApi() // Get access to the pre-configured HTTP client.

const { showSuccessNotification } = useNotifications() // Get access to the notification functions.

async function triggerLogMessage () { // Function called by clicking on the button.
  await gameServerApi.get('/logTest') // Use it to make a GET call to the HTTP API.
  showSuccessNotification('Message logged successfully.')
}
</script>
Finally, we inject this new component into the System page using our API hooks. In your gameSpecific.ts file, introduce the new component using the addUiComponent API function as follows:
// Inject custom component for testing API call.
initializationApi.addUiComponent(
  'System/Details',
  {
    uniqueId: 'ApiTestCall',
    vueComponent: async () => await import('./MessageLogButton.vue'),
    width: 'full'
    // Set the 'displayPermission' property to require permission to view this component.
    // The component is hidden if a user does not have the required permission.
    // displayPermission: 'api.log_test'
  },
  { position: 'before' }
)
INFO
Note: The Integration API is a great way to add custom content, components and completely custom pages to the LiveOps Dashboard. For a more in-depth explanation and examples of how it works have a look at Customizing the LiveOps Dashboard Frontend
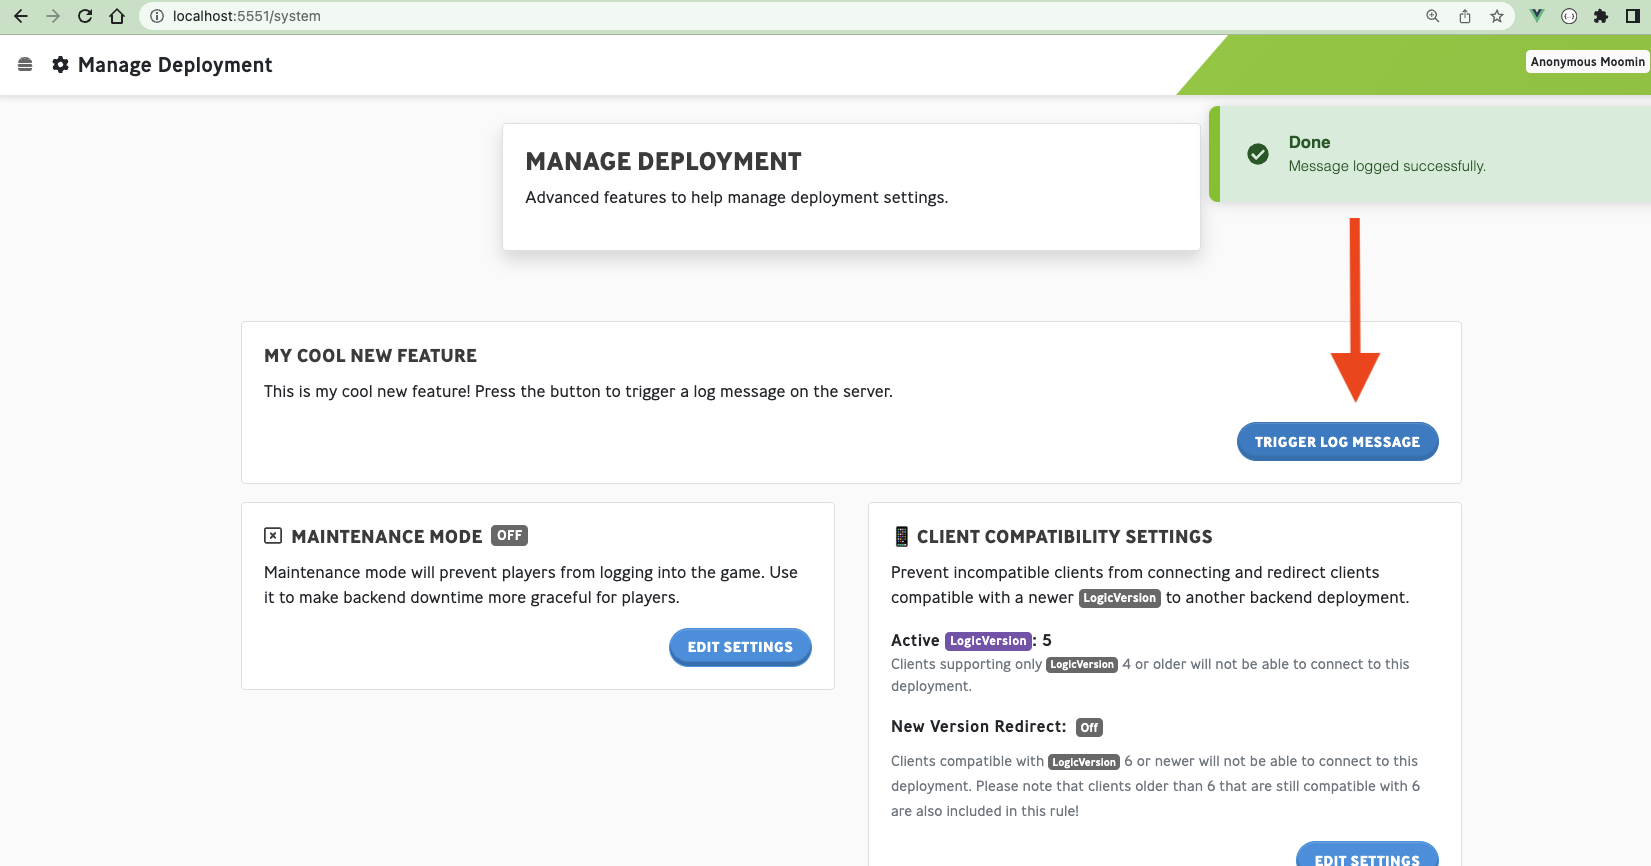
With the game server still running, also run the dashboard (for example via npm run serve) and open the page we just edited by navigating to http://localhost:5551/system/. You should see the newly created card and a button at the bottom of the page. Press the button to see a log message pop up in the game server's terminal output!

Next, we will want to add an authorization requirement to the new endpoint to protect it from misuse. You can skip this section if you are absolutely sure that you will never need to adopt authorization in your game or if the feature is safe enough to allow anyone to perform it in your production environment.
First, we need the new permission to exist. Permissions are defined inside the game server code and are split into two categories: Metaplay core permissions, and game-specific permissions. We are adding game-specific permission here, so we'll want to add the following code to GamePermissions.cs, which can be found in the Backend/Server/AdminApi/ directory.:
[AdminApiPermissionGroup("Game-specific permissions")]
public static class GamePermissions
{
  [MetaDescription("Use the log test feature.")]
  [Permission(DefaultRole.GameAdmin)]
  public const string ApiLogTest= "api.log_test";
}Now that we've defined a permission, it's easy to limit the endpoint so that only users who have that permission can access it. We do that by decorating the endpoint's function with a RequirePermission attribute:
/// <summary>
/// Example API endpoint.
/// </summary>
[HttpGet("logTest")]
[RequirePermission(GamePermissions.ApiLogTest)]
public async Task<IActionResult> GetLogTest()
{
    // Log a message to show that we successfully invoked this endpoint.
    _logger.LogInformation($"{Request.Method} request to {Request.Path}");

    return new LogTestResponse { DummyValue = "Some Value" };
}When we defined the new permission in step 5, we also defined the list of roles that are granted the permission. We could also have defined the roles in your game server’s base runtime options: Options.base.yaml. Inside the Authentication section we could add the following instead:
## Authentication

Authentication:
  Permissions:
    # Metaplay core permissions
    # ...
    # Game-specific permissions
    api.log_test: [ game-admin, customer-support-senior ]
INFO
Note: Defining new roles is outside the scope of this article. For more information, see Dashboard User Authentication
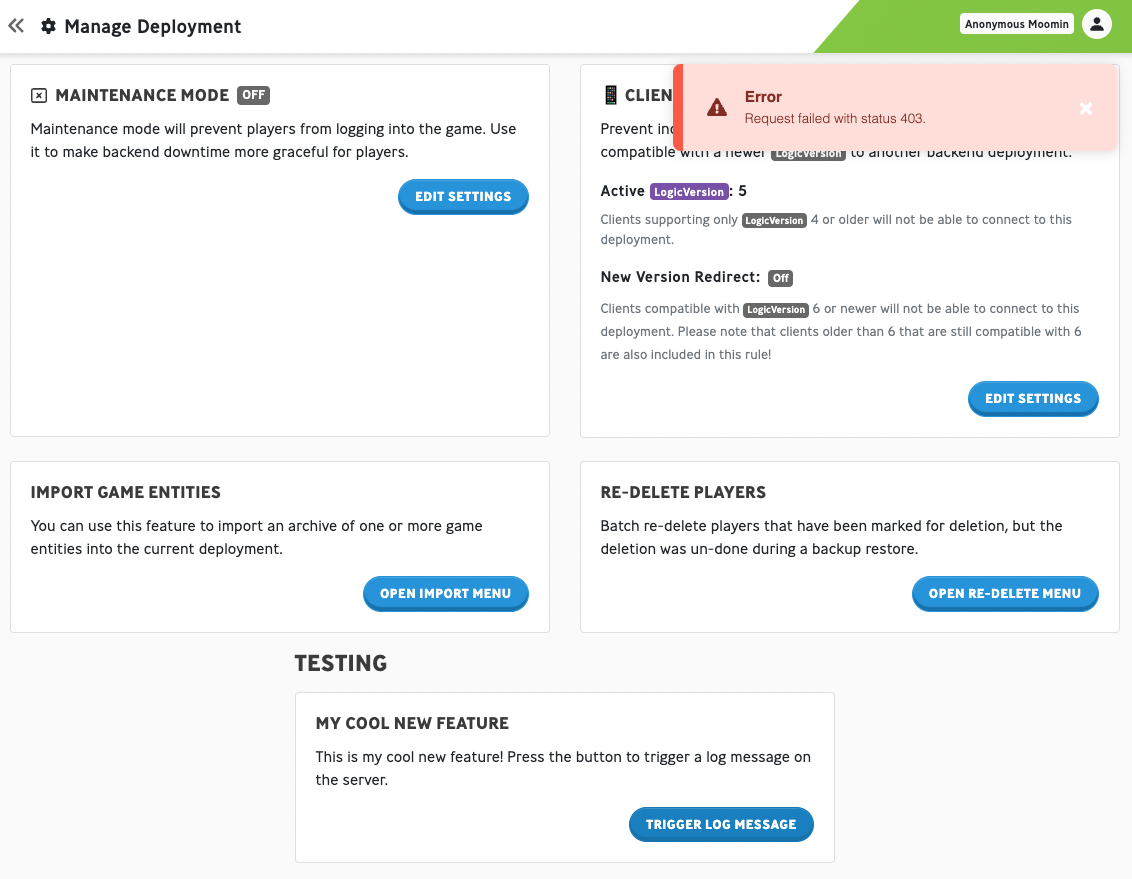
If you restart the game server and navigate to the System page, you'll find that the button now only works if you have the game-admin role assigned to your user. If you don't, you'll see an error pop-up when you click the button:

The error message happens because we tried to call an API endpoint that we are not authorized to, and the game server blocked the request and returned an HTTP 403 Forbidden error. The error message serves to reassure us that the authorization is working correctly, but we'll tidy things up a little in the next step.
We'll set up the dashboard button so that you won't be able to click on it if you don't have the required permission - this will prevent users from seeing errors. Doing this with a meta-button is trivial, we just need to add a permission attribute. Change your button's code in MessageLogButton.vue:
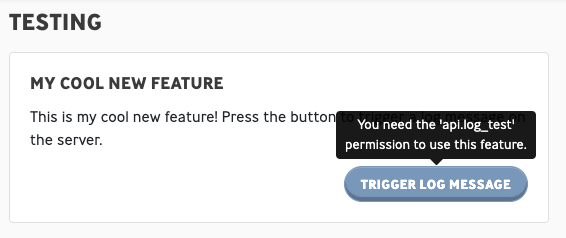
MButton(@click="triggerLogMessage" permission="api.log_test" variant="primary") Trigger Log MessageAfter the page reloads, you will see that the button is now disabled if you don't have the required permission:

A helpful tooltip shows the user which permission they require for the feature, making it easy to request access if they need to.
Finally, we'd like to have an audit trail of when a user accesses our new feature. Obviously, this is overkill for our trivial test feature that does not do anything meaningful, but if we were doing something more serious, like changing the state of a player, then we would definitely want this to be recorded.
Adding an audit event is easy, but we need to add code in a couple of places. First, in GameAuditLogEventCodes.cs (located in Backend/Server/AdminApi/), we'll define a unique code number for the event:
namespace Game.Server.AdminApi.AuditLog
{
    public class GameAuditLogEventCodes
    {
        public const int GameServerLogTest = 10_500; // Add this line
    }
}
Next, we'll define the event itself in the LogController class (in the Controllers/GameSpecific directory):
/// <summary>
/// Audit log event.
/// </summary>
[MetaSerializableDerived(GameAuditLogEventCodes.GameServerLogTest)]
public class GameServerEventLogTest : GameServerEventPayloadBase
{
    public GameServerEventLogTest() { }
    override public string SubsystemName => "Logging";
    override public string EventTitle => "Log test";
    override public string EventDescription => "Log test was performed";
}
INFO
Pro tip: If you're logging an event that's related to a specific player, you can derive your event from the PlayerEventPayloadBase class to automatically include a reference to the player in the event's data.
Finally, we'll write this log event inside the endpoint's handler function:
/// <summary>
/// Example API endpoint.
/// </summary>
[HttpGet("logTest")] // This attribute defines the URL and type of this endpoint.
[RequirePermission(GamePermissions.ApiLogTest)]
public async Task<ActionResult<LogTestResponse>> GetLogTest()
{
    // Log a message to show that we successfully invoked this endpoint.
    _logger.LogInformation($"{Request.Method} request to {Request.Path}");

    // Audit log event
    await WriteAuditLogEventAsync(new GameServerEventBuilder(new GameServerEventLogTest()));

    // Return response
    return new LogTestResponse { DummyValue = "Some Value" };
}After restarting the game server and clicking on the button, we'll see confirmation of the feature being activated and confirmation that the audit event was logged in the game server's logs:
[XX:XX:XX.XXX INF Game.Server.AdminApi.Controllers.LogController] GET request to /api/logTest
[XX:XX:XX.XXX INF Game.Server.AdminApi.Controllers.LogController] Audit Log event: $GameServer:Logging Game.Server.AdminApi.Controllers.LogController+GameServerEventLogTest 0000017c36b93018-38e34e10-d71b-47e3-8835-4f67eac18595
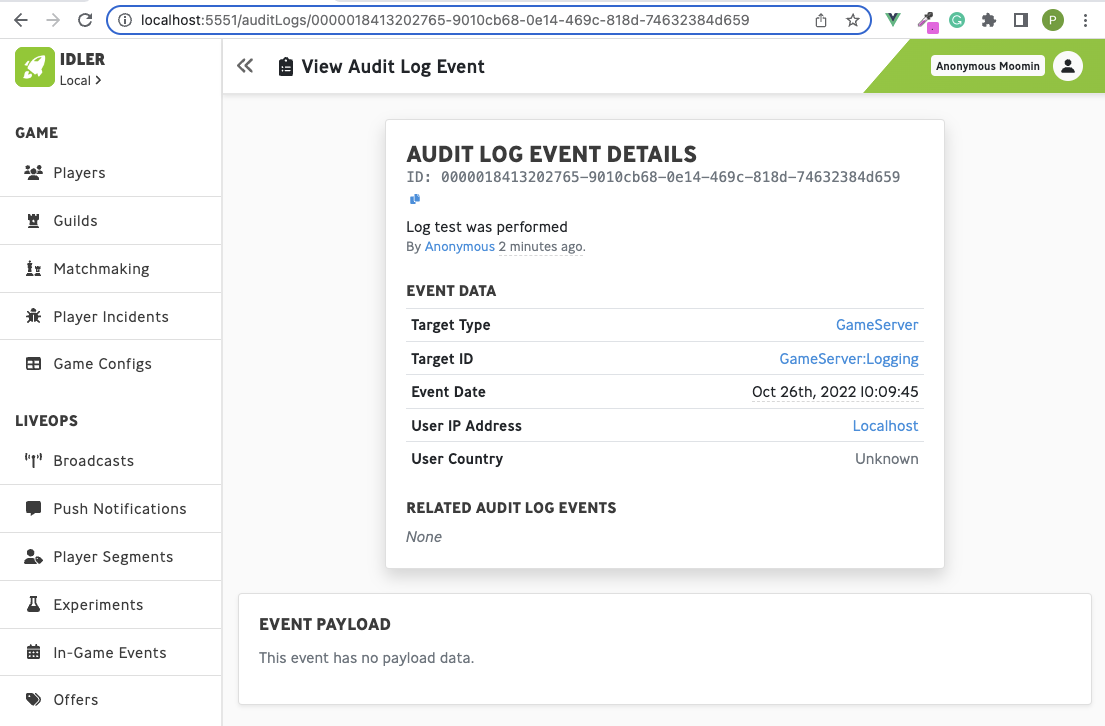
If you look in the Audit Logs tab of the dashboard you'll see the event listed. Clicking on the event in this list takes you to the detailed view. Note that our example event type has an empty payload, but you can use [MetaMember] attributes to store any extra information that you like inside the payload. It's good practice to include as much relevant information as possible inside your event payloads.

What happens if your API endpoint throws or an exception? Let's try it and see. Add this inside your GetLogTest function:
public async Task<ActionResult<LogTestResponse>> GetLogTest()
{
    throw new System.Exception("Oh no!");
}
Now if we click on the button in the dashboard, we'll see a 500 error returned. You'll see this error in a toast on the page itself, but you can also use Curl to allow you to inspect the error more comfortably:
➜  ~ curl localhost:5550/api/logTest -s | jq
{
  "error": {
    "statusCode": 500,
    "message": "Internal server error.",
    "details": "Oh no!"
  }
}
Now we can clearly see that the exception was returned to us as a 500 internal server error with the exception message included. The Metaplay SDK does this by default - catching the exception and wrapping it up into a nicely formatted error message.
What happens if you want to return something more useful to your user - what if there was an actual error in their request or an error that was handled without resorting to throwing an exception? You can return these by throwing a MetaplayHttpException exception. For example, let's pretend that the server is doing some sort of rate limiting and wants to deny our request to the /api/logTest endpoint with an HTTP 429 error code. We can write that as:
public async Task<ActionResult<LogTestResponse>> GetLogTest()
{
    throw new MetaplayHttpException(429, "Cool your jets.", "Your request has been refused because you made too many requests.");
}
And if we hit the endpoint with Curl we see:
➜  ~ curl localhost:5550/api/logTest -s | jq
{
  "error": {
    "statusCode": 429,
    "message": "Cool your jets.",
    "details": "Your request has been refused because you made too many requests."
  }
}