
Appearance
Localization
The page describes how Metaplay's localization system works and how you can integrate it into your game.
The page describes how Metaplay's localization system works and how you can integrate it into your game.
Metaplay contains a localization system that delivers appropriate translation files to the game. The system is only concerned with the delivery and management of translation data, and it's up to you to display the translations in-game. Currently, only string translations are supported. The localization system does not support other data formats or non-language-based localization (such as location-based).
You may inspect the localization system state with the built-in editor component of the MetaplaySDK game object in the Unity editor:
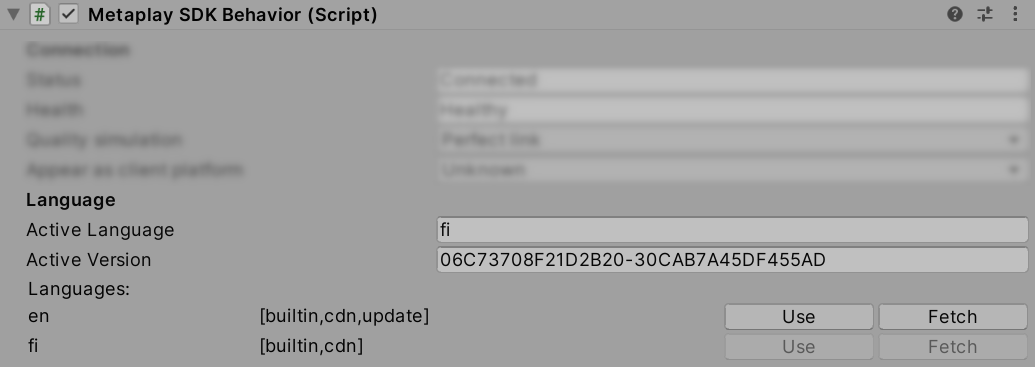
Localization settings in the Metaplay SDK component.
The inspector shows the current MetaplaySDK.ActiveLanguage, and the version of the language data. Below them, you can also see the state of all known languages. For each language, the inspector shows the LanguageId and the localization sources:
builtin for languages with a translation file baked into the application package. You should have at least one language baked in to allow the application to have a default localization on the first session.cdn for languages for which there is a translation file available in the CDN.cached for languages with localization files downloaded from the CDN and cached into the app.update if there is an updated version of the language available in the CDN.By clicking "Use,” the localization system switches over the language to the one selected. If the language was not found in the cache nor is it built into the client, it will be downloaded first. A language can be downloaded without switching to it by clicking "Fetch," which starts a background download for the language. You can only download languages that have both cdn and update flags.
Here's a quick guide on the steps necessary to integrate Metaplay's localization features:
In your MetaplayCoreOptions, set MetaplayFeatureFlags.EnableLocalizations to true:
public MetaplayCoreOptions Options { get; } = new MetaplayCoreOptions(
    <snip>
    featureFlags: new MetaplayFeatureFlags
    {
        EnableLocalizations = true // Set to true to enable localizations!
    });
Good to know
If you've manually defined permissions for the project in Options.*.yaml, then you will also have to add permissions for api.localization.view and api.localization.edit. The default permissions for these are api.localization.view: [ game-admin, game-viewer ] and api.localization.edit: [ game-admin ].
For localization to work, you'll have to create the database tables. You can do this by opening a terminal in the Backend/Server directory and running the following commands.
dotnet tool install --global dotnet-ef
dotnet ef migrations add AddedLocalizations
See Changes to the Schema in the Working with the Database page for more information.
Translation files are spreadsheets with keys for every string that should be localized, followed by translations for every respective language.
| TranslationId | en | fi | ... |
|---|---|---|---|
| hello.world | Hello, World! | Hei, maailma! | |
| ui.appname | Idle WebDev | Loikoileva VerkkoKehitys | |
| ... |
The first row is exclusive for TranslationId and the language tags. The following rows have the keys and translated strings themselves.
You must add localization information to your game configs to tell the SDK which languages your game supports. Here's a simplified example of how the Languages sheet in your game configs should look like:
| LanguageId #key | DisplayName |
|---|---|
| en | English |
| fi | Finnish |
| zh-Hans | Simplified Chinese |
| zh-Hant | Traditional Chinese |
| ... |
To do that, use the SDK's LanguageInfo class. Since it implements an IGameConfigData interface, you can add localization configs to your SharedGameConfig to access them.
public class SharedGameConfig : SharedGameConfigBase
{
    ...

    [GameConfigEntry("Languages")]
    public GameConfigLibrary<LanguageId, LanguageInfo> Languages { get; private set; }
}
You need to build the configs manually!
The SDK's default config builder does not build localization archives automatically. Check out Building Localization Archives in the Advanced Guide section for information on how to do that.
Finally, you can access the translated strings on the client:
MetaplaySDK.ActiveLanguage to localize the game.MetaplaySDK.LocalizationManager.SetCurrentLanguage() to change the active language of the game.To detect any language changes and know when to refresh the translations in the UI, a custom MetaplayLocalizationDelegate needs to be supplied. You can add the delegate to the SDK init function:
MetaplayClient.Initialize(new MetaplayClientOptions
{
    <snip>
    LocalizationDelegate = new GameLocalizationDelegate(),
});
And subsequently, create your implementation to refresh the UI.
class GameLocalizationDelegate : DefaultMetaplayLocalizationDelegate
{
    public override void OnActiveLanguageChanged()
    {
        // TODO: Refresh translations in UI
    }
}Server-side code may access a player's currently active localization strings by calling PlayerActorBase.GetLocalizationLanguageAsync(). This attempts to return the same version of the language the client is running. If that is not possible, the method returns the latest version of the player's language. As with client-side localization, the SDK currently only supports string translations.
To build localizations from the dashboard, you have to provide an implementation of the GameConfigBuildIntegration.GetAvailableLocalizationsBuildSources(string sourceProperty) method. You might already have an implementation of GameConfigBuildIntegration for game config builds, in which case you can add the method to the same instance.
public class IdlerGameConfigBuildIntegration : GameConfigBuildIntegration
{
    private const string Google_Sheets_Spreadsheet_Id = "VALUE";

    public override IEnumerable<GameConfigBuildSource> GetAvailableLocalizationsBuildSources(string sourceProperty)
    {
        return new []
        {
            new GoogleSheetBuildSource("Master sheet", Google_Sheets_Spreadsheet_Id),
        };
    }
}Localizations can also be built from the Unity Editor. This example implementation relies on the GameConfigBuildIntegration from the Building From The Dashboard step.
const string ServerLocalizationsPath = "Backend/Server/GameConfig/Localizations.mpa";
const string ClientLocalizationsPath = "Assets/StreamingAssets/Localizations";

private static IGameConfigSourceFetcherConfig FetcherConfig => GameConfigSourceFetcherConfigCore.Create()
    .WithGoogleCredentialsFilePath(GoogleSheetsCredentials);

[MenuItem("MyGame/Build Localizations")]
static void TryBuildLocalizations()
{
    EditorTask.Run(nameof(BuildLocalizationsArchiveAsync), BuildLocalizationsArchiveAsync);
}

static async Task BuildLocalizationsArchiveAsync()
{
    GameConfigBuildIntegration integration = IntegrationRegistry.Get<GameConfigBuildIntegration>();
    LocalizationsBuild build = integration.MakeLocalizationsBuild(FetcherConfig);

    // \note: hard-coded to using first available build source for localizations.
    GameConfigBuildSource source = integration.GetAvailableLocalizationsBuildSources(nameof(LocalizationsBuildParameters.DefaultSource)).First();

    DefaultLocalizationsBuildParameters buildParams = new DefaultLocalizationsBuildParameters()
        { DefaultSource = source };

    // Execute the build
    var localizationsArchive = await build.CreateArchiveAsync(MetaTime.Now, buildParams, CancellationToken.None);

    // Write to the server localization directory, to be shipped with the next server deployment.
    await ConfigArchiveBuildUtility.WriteToFileAsync(ServerLocalizationsPath, localizationsArchive);

    // To prevent stray localizations (e.g. from a deleted language) from sticking around, you can optionally delete the directory.
    Directory.Delete(ClientLocalizationsPath, recursive: true);

    // The client expects the initial localization (the ones shipped with the game) to be in a one-file-per-language format in the StreamingAssets folder.
    ConfigArchiveBuildUtility.FolderEncoding.WriteToDirectory(localizationsArchive, ClientLocalizationsPath);

    // Refresh AssetDatabase to make sure Unity sees changed files
    AssetDatabase.Refresh();
}If you don’t have Google Sheets integrated into your configs workflow yet, you can also build your localization archives from local files:
First, configure the available build sources to use a file from your disk:
public class IdlerGameConfigBuildIntegration : GameConfigBuildIntegration
{
    public override IEnumerable<GameConfigBuildSource> GetAvailableLocalizationsBuildSources(string sourceProperty)
    {
        return new[] { new FileSystemBuildSource(FileSystemBuildSource.Format.Csv) };
    }
}
Then, you can configure the source fetcher to read a given file instead of reading from Google Sheets.
The rest of the code can remain the same. The localization builder will now look for a Localizations.csv file in the ./ directory.
private const string LocalizationDirectory = "./";
private static IGameConfigSourceFetcherConfig FetcherConfig => GameConfigSourceFetcherConfigCore.Create()
.WithLocalFileSourcesPath(LocalizationDirectory);To upload the game config to a server, you can use the GameConfigBuildUtil.PublishLocalizationArchiveToServerAsync utility. The AdminApi base URL and authorization token can be found in the Environment Configs.
EnvironmentConfig environmentConfig = DefaultEnvironmentConfigProvider.Instance.GetEnvironmentConfig("develop");
string authorizationToken = await environmentConfig.FetchAuthorizationTokenAsync();
await GameConfigBuildUtil.PublishLocalizationArchiveToServerAsync(environmentConfig.ClientGameConfigBuildApiConfig.AdminApiBaseUrl, localizationsArchive, authorizationToken, confirmDialog: false);It's possible to override the language IDs used in your game, though we strongly recommend not doing this!
By default, the MetaplaySDK maps LanguageIds by their ISO 639-1 (2-letter-names) language codes such as 'en' for English and 'fi' for Finnish, but you can customize this with your own implementation of LanguageIdMapping:
class MyLanguageIdMapping : LanguageIdMapping
{
    public override LanguageId TryGetLanguageIdForDeviceLanguage(SystemLanguage systemLanguage)
    {
        // LanguageIDs are "<language>-<region>"
        if (systemLanguage == SystemLanguage.English) return LanguageId.FromString("en-US");
        if (systemLanguage == SystemLanguage.Finnish) return LanguageId.FromString("fi-FI");
        return null;
    }
}Once you get your localizations going, you might want to start working on integrating it to your LiveOps Dashboard using Google Sheets in your workflow. Check out Managing Game Configs from the Dashboard.