
Appearance
Tutorial: Game Logic
This article gives a practical overview of how to program games using Metaplay’s actions and models paradigm by implementing a clone of Wordle using the Metaplay SDK.
This article gives a practical overview of how to program games using Metaplay’s actions and models paradigm by implementing a clone of Wordle using the Metaplay SDK.
MetaplaySamples/ directory with the sample projects inside.In this tutorial, we will implement a simple version of Wordle, a daily word-guessing game where you are given a five-letter word to guess. If you haven’t already, give the original game a go to get familiar with its core mechanics. It’s quick to play and great fun!
To get a simplified prototype going, we have to implement the following game mechanics:
To save a bit of time and to keep this tutorial simple, we will make the following trade-offs:
The source code for this project is available in the Metaplay SDK package in the MetaplaySamples/Wordle directory. You can use it to follow along or fire it up and see it in action!
The project includes the code from this guide as well as from Tutorial: Game Configs and Tutorial: Cheat-Proof Gameplay. To switch between the available options, use the Tutorial dropdown and choose Part 1: Game Logic for the code corresponding to this page.

Here’s a look at the Actions we’ll implement to create the gameplay loop:
PlayerAddLetter adds characters to the current guess.PlayerDeleteLetter removes a character from the current guess.PlayerSubmitGuess checks if the guess is correct and either ends the game or initiates a new guess on the next row.PlayerAdvanceRound starts a new match.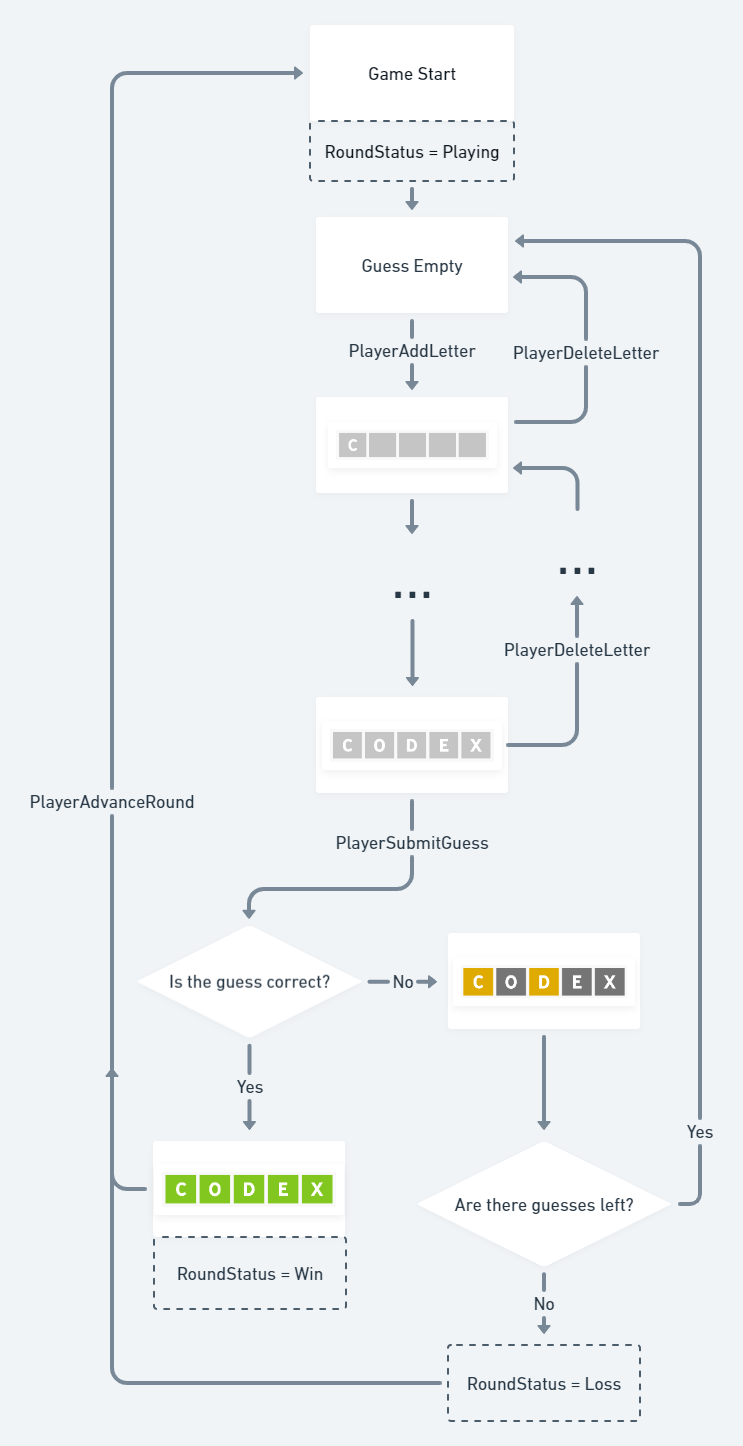
After successfully integrating the Metaplay SDK into your project, you can use the ApplicationStateManager script from HelloWorldScene to initialize Metaplay and connect to the server. The actual game-specific logic is hosted in a GameManager prefab that we will replace with the logic of our game.

/// <summary>
/// Switch the application's state and perform actions relevant to the state transition.
/// </summary>
/// <param name="newState"></param>
void SwitchToState(ApplicationState newState)
{
    Debug.Log($"Switching to state {newState} (from {_applicationState})");

    switch (newState)
    {
        case ApplicationState.AppStart:
            // Cannot enter, app starts in this state.
            break;

        case ApplicationState.Initializing:
            // Simulate the transition away from the Game scene by destroying the GameManager instance.
            // In addition to the Game scene, it's possible to arrive here from Initializing state itself,
            // in case the connection fails before a session was started. In that case there is no
            // GameManager instance.
            if (_gameManager != null)
            {
                Destroy(_gameManager.gameObject);
                _gameManager = null;
            }

            // Make sure connection error info is hidden.
            ConnectionErrorPopup.SetActive(false);

            // Start connecting to the server.
            MetaplayClient.Connect();
            break;

        case ApplicationState.Game:
            // Make sure connection error info is hidden.
            ConnectionErrorPopup.SetActive(false);

            // Start the game. Simulate the transition to in-game state by spawning the GameManager.
            // You might want to use scene transition instead.
            _gameManager = Instantiate(GameManagerPrefab);
            break;
    }

    // Store the new state.
    _applicationState = newState;
}The first thing that needs to be done is a UI so we can visualize the features we implement. The game’s UI isn’t dependent on Metaplay at all, and you can structure your UI components in Unity however you like. Just remember each word is five letters, and each letter should have a colored square behind it.
The Assets/SharedCode/ directory contains the code the client shares with the server. This means our PlayerModel.cs and PlayerActions.cs and could include things like other Models and game configs. Your client-only code, however, can be wherever you like. Here’s a quick look at the location of the files that interest us:
Assets
+---SharedCode
¦   +---Player
¦   ¦   +---PlayerModel.cs // The model will store our player's data
¦ ¦ +---PlayerActions.cs // Actions will mutate the above modelAfter connecting the keyboard (either your real keyboard or a virtual one like in the example), we need a place to both store the current guess and send the letters. This place is the PlayerModel. The PlayerModel should be used to store every variable we’d like to load from the server on startup and persist between sessions.
/// <summary>
/// Class for storing the state and updating the logic for a single player.
/// </summary>
[MetaSerializableDerived(1)]
[SupportedSchemaVersions(1, 1)]
public class PlayerModel :
    PlayerModelBase<
        PlayerModel,
        PlayerStatisticsCore
        >
{
    public const int TicksPerSecond = 10;
    public const int WordSize = 5;
    public const int MaxGuesses = 6;
    // Here are the hardcoded values for each round's solution.
    static readonly List<string> Solutions = new List<string> { "MODEL", "GAMES", "SERVE", "LOGIC" };
    protected override int GetTicksPerSecond() => TicksPerSecond;

    // Player profile
    [MetaMember(100)] public sealed override EntityId           PlayerId    { get; set; }
    [MetaMember(101), NoChecksum] public sealed override string PlayerName  { get; set; }
    [MetaMember(102)] public sealed override int                PlayerLevel { get; set; }

    // Round status
    [MetaMember(200)] public int                    RoundIndex      { get; set; } = 0;
    [MetaMember(201)] public RoundStatus            RoundStatus     { get; set; } = RoundStatus.Playing;

    // Active round state
    [MetaMember(202)] public string                 CurrentWord     { get; set; } = "";
By declaring the member with the [MetaMember] attribute, it automatically gets persisted in the database as well as sent over to the client when connecting to the server. Whenever you add a new [MetaMember] variable to a Player Model in a game that has already gone live, the existing players get the default value for that member.
Pro tip!
For more complex cases, you can have other sub-models contained in PlayerModel, like a PlayerWalletModel to keep your player’s currency or PlayerCityModel to keep their settlement in a base-building game, for example.
To update our CurrentWord, we shall set up the corresponding PlayerAction.
/// <summary>
/// Registry for game-specific ActionCodes, used by the individual PlayerAction classes.
/// </summary>
public static class ActionCodes
{
    public const int PlayerAddLetter = 5000;
    public const int PlayerDeleteLetter = 5001;
    public const int PlayerSubmitGuess = 5002;
    public const int PlayerAdvanceRound = 5003;
}

/// <summary>
/// Game-specific results returned from <see cref="PlayerActionCore.Execute(PlayerModel, bool)"/>.
/// </summary>
public static class ActionResult
{
    // Shadow success result
    public static readonly MetaActionResult Success = MetaActionResult.Success;

    // Game-specific results
    public static readonly MetaActionResult WordEmpty       = new MetaActionResult(nameof(WordEmpty));
    public static readonly MetaActionResult WordFull        = new MetaActionResult(nameof(WordFull));
    public static readonly MetaActionResult WordIncomplete  = new MetaActionResult(nameof(WordIncomplete));
public static readonly MetaActionResult InvalidLetter = new MetaActionResult(nameof(InvalidLetter));ActionResults are like game-specific error codes, and allow you to deal with such situations without creating exceptions or getting runtime errors. In this case we have one for if the guess we're trying to send a letter to is already full and one fortrying to send an invalid letter.
Whenever a letter is entered, we’d then call the action from our client code:
public void OnAddLetter(string message)
{
    MetaplayClient.PlayerContext.ExecuteAction(new PlayerAddLetter(message[0]));
}
Finally, the Action itself works as follows:
// Game Actions
[ModelAction(ActionCodes.PlayerAddLetter)]
public class PlayerAddLetter : PlayerAction
{
    // Letter sent by the player
    public char Letter { get; private set; }

    private PlayerAddLetter() { }
    public PlayerAddLetter(char letter) { Letter = letter; }

    public override MetaActionResult Execute(PlayerModel player, bool commit)
    {
        if (Letter < 'A' || Letter > 'Z')
            return ActionResult.InvalidLetter;
        if (player.CurrentWord.Length == PlayerModel.WordSize)
            return ActionResult.WordFull;

        if (commit)
        {
            player.CurrentWord = player.CurrentWord + Letter;
        }

        return ActionResult.Success;
    }
}You can access the PlayerModel in your client code through MetaplayClient.PlayerModel. This way, you can read every variable to keep the UI updated. To be able to update our UI correctly, we’ll also add some new members to the PlayerModel.
[MetaSerializable]
public enum GuessResult
{
    Empty,      // No result yet
    Correct,    // Correct letter in correct place
    Partial,    // Correct letter in wrong place
    Wrong       // Incorrect letter
}

/// <summary>
/// Class for storing the state and updating the logic for a single player.
/// </summary>
[MetaSerializableDerived(1)]
[SupportedSchemaVersions(1, 1)]
public class PlayerModel :
    PlayerModelBase<
        PlayerModel,
        PlayerStatisticsCore
        >
{
    public const int TicksPerSecond = 10;
    public const int WordSize = 5;
    public const int MaxGuesses = 6;
    // Here are the hardcoded values for each round's solution.
    static readonly List<string> Solutions = new List<string> { "MODEL", "GAMES", "SERVE", "LOGIC" };
    protected override int GetTicksPerSecond() => TicksPerSecond;

    // Player profile
    [MetaMember(100)] public sealed override EntityId           PlayerId    { get; set; }
    [MetaMember(101), NoChecksum] public sealed override string PlayerName  { get; set; }
    [MetaMember(102)] public sealed override int                PlayerLevel { get; set; }

    // Round status
    [MetaMember(200)] public int                    RoundIndex      { get; set; } = 0;
    [MetaMember(201)] public RoundStatus            RoundStatus     { get; set; } = RoundStatus.Playing;

    // Active round state
    [MetaMember(202)] public string                 CurrentWord     { get; set; } = "";


    [MetaMember(203)] public List<string>           GuessedWords    { get; set; } = new List<string>();
Notice we also added an Enum with the possible results for each letter. We will need it later when we implement coloring the guessed letters after checking for the solution. Marking the color as Empty means the word is either incomplete or hasn’t been checked against the solution yet.
In our Update() method, we fetch the information and update the game:
// Update current word in UI (if still guessing)
if (player.GuessedWords.Count < PlayerModel.MaxGuesses)
{
Row row = GuessRows[player.GuessedWords.Count].GetComponent<Row>();
for (int letterNdx = 0; letterNdx < PlayerModel.WordSize; letterNdx++)
{
string letter = (letterNdx < player.CurrentWord.Length) ? player.CurrentWord.Substring(letterNdx, 1) : "";
row.chars[letterNdx].text = letter;
row.images[letterNdx].color = GetResultColor(GuessResult.Empty);
}
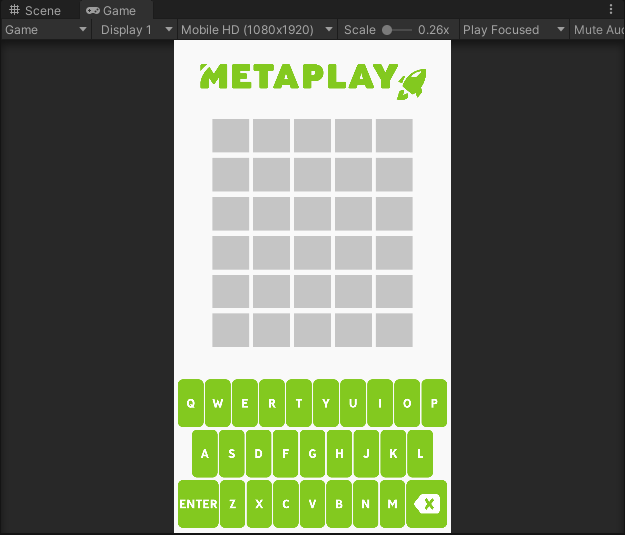
}Here is our result for this stage:
To finalize the guesses, we need a solution to check against. For this tutorial’s purposes, we will hard-code a value since we only have a small amount of data (and also to keep the scope tight). In the next tutorial, we will update this logic to make use of Metaplay's game configs system.
We'll add our solutions to the PlayerModel and create a GetSolutionForRound method to fetch the solution for the current round.
// Here are the hardcoded values for each round's solution.
static readonly List<string> Solutions = new List<string> { "MODEL", "GAMES", "SERVE", "LOGIC" };// Fetches current result from Solutions list
public string GetSolutionForRound(int roundNdx)
{
return Solutions[roundNdx % Solutions.Count];
}We'll check the solution in the PlayerSubmitGuess Action:
[ModelAction(ActionCodes.PlayerSubmitGuess)]
public class PlayerSubmitGuess : PlayerAction
{
    public override MetaActionResult Execute(PlayerModel player, bool commit)
    {
        if (player.CurrentWord.Length != PlayerModel.WordSize)
            return ActionResult.WordIncomplete;
        if (player.GuessedWords.Count == PlayerModel.MaxGuesses)
            return ActionResult.TooManyGuesses;

        if (commit)
        {
            // Evaluate the guess result
            string          solution    = player.GetSolutionForRound(player.RoundIndex);
            bool            isSolved    = player.CurrentWord == solution;
            GuessResult[]   result      = EvaluateWordGuess(player.CurrentWord, solution);

            // Remember guessed word, evaluated result & clear current word
            player.GuessedWords.Add(player.CurrentWord);
            player.GuessResults.Add(result);
            player.CurrentWord = "";

            // Game is finished with the correct guess, or if guesses ran out
            if (isSolved || (player.GuessedWords.Count == PlayerModel.MaxGuesses))
                RoundFinished(player, isSolved, solution);
        }

        return ActionResult.Success;
    }
PlayerSubmitGuess then uses the EvaluateWordGuess method to check the result and assign the correct colors to each letter.
private GuessResult[] EvaluateWordGuess(string guess, string solution)
{
char[] remaining = solution.ToCharArray();
GuessResult[] results = new GuessResult[guess.Length];
// Find all correct letters in correct place
for (int i = 0; i < guess.Length; i++)
{
if (guess[i] == remaining[i])
{
results[i] = GuessResult.Correct;
remaining[i] = '\0';
}
}
// Find all correct letters in incorrect places
for (int i = 0; i < guess.Length; i++)
{
// Only handle non-matched letters
if (results[i] == GuessResult.Empty)
{
int foundNdx = Array.IndexOf(remaining, guess[i]);
if (foundNdx != -1)
{
results[i] = GuessResult.Partial;
remaining[foundNdx] = '\0';
}
else
results[i] = GuessResult.Wrong;
}
}
return results;
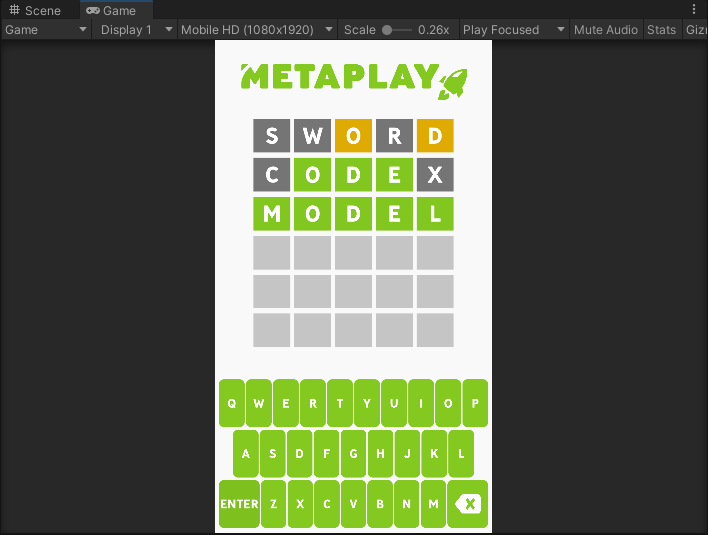
}After implementing UI support for coloring the end result, we get something like this:

At this point, you would continue developing the game as usual, adding more Actions and members to your Player Model as necessary. By storing every guess and guess result in the Player Model, and having an Update() method that fetches all of the information, you can keep the UI updated, and a player could leave a game unfinished and resume it in their next session.
Safety First!
This implementation trusts the client with the solution. Hackers could potentially cheat and view the answer before playing. We address this in part 3 of this series: Tutorial: Cheat-Proof Gameplay
After learning to work with Metaplay’s programming model and having a good grasp of gameplay programming, a good next step would be to start exploring the game configs. If you've already gone through Setting Up Game Configs, dive into the next tutorial in this series: Tutorial: Game Configs! In this guide, we modify the game to accommodate sourcing the solution from the configs system, which means we can modify the configs without editing the game's source code.
Alternatively, you can take a look at Introduction to the LiveOps Dashboard to learn how to use the dashboard to manage your game when it's live.