Appearance
Configuring LiveOps Events
This page describes various ways to configure LiveOps in-game events.
Appearance
This page describes various ways to configure LiveOps in-game events.
Familiarity with game configs - To create event templates, it's necessary to add them to your game's configs. Check out Setting Up Game Configs for more information.
A working implementation of a LiveOps Event - This builds on top of the event that was implemented in Implementing LiveOps Events. Even if you didn't follow the tutorial, we recommend that you familiarize yourself with how the implementation works so you can follow this guide more easily.
Besides the basic implementation presented in Implementing LiveOps Events, there are several ways to further configure and customize events and the LiveOps Dashboard. In this page, we continue using the "Button-Clicking Event" example to illustrate event configuration possibilities. We'll cover editing and scheduling events, as well as targeting specific player segments, creating event templates, and customizing the dashboard's UI.
After an event has been created, it can still be edited. You can access the editing form with the Edit button on the event's page. Editing client-visible properties of an event will cause them to be updated for clients.
Some parts of an event's settings become uneditable as the event progresses: for example, the scheduled start time can no longer be changed after the event has already started. Note that for an event with a player-local schedule, the event progress is tracked based on the most advanced possible time zone (UTC+14). This means an event's start time becomes uneditable as soon as the start time has been reached in the most advanced time zone, even if the event is still upcoming in other time zones.
The event creation and editing forms, by default, allow editing all of the properties declared in your event configuration class deriving from LiveOpsEventContent.
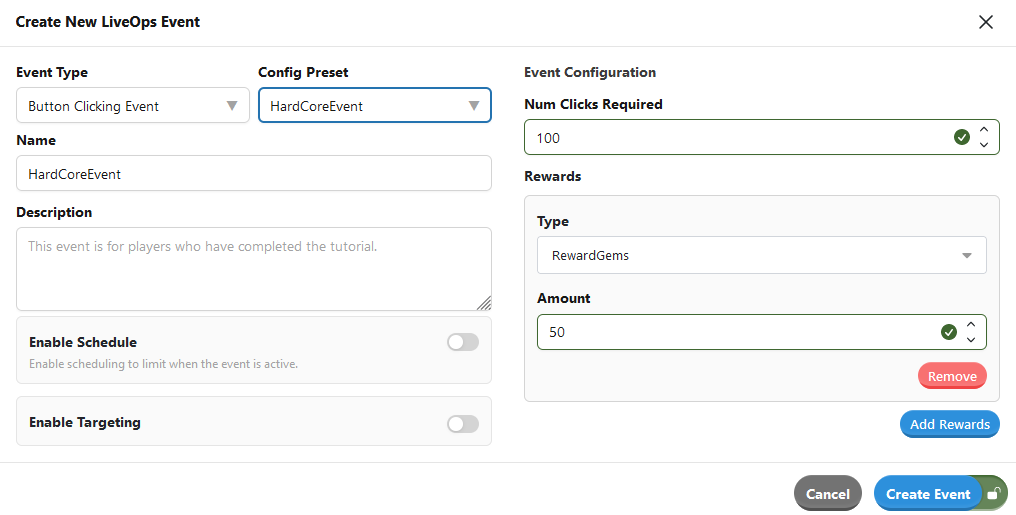
This enables populating the full event configuration for a new event instance fully from the LiveOps Dashboard. In cases where the full configuration is more complex, you can introduce templates (also called presets) for event configuration in your game configs.
To create a template, first add a game config library in the server-only configs for the button-clicking event. You can use the LiveOpsEventTemplateConfigData<TContentClass> utility for directly declaring the config template library in your ServerGameConfig class like this:
public class ServerGameConfig : ServerGameConfigBase
{
    ...
    [GameConfigEntry("ButtonClickingEventTemplates")]
    public GameConfigLibrary<LiveOpsEventTemplateId, LiveOpsEventTemplateConfigData<ButtonClickingEvent>> ButtonClickingEventTemplates { get; private set; }
}
Then, introduce the source sheet for the template data with a few presets:

Each template row needs to have a TemplateId property so that it can be referred to in the event creation form. The actual configuration properties for the event content are introduced as columns prefixed with Content to match the structure of the LiveOpsEventTemplateConfigData utility class.
Pro Tip:
For custom mapping from the associated sheet to the resulting LiveOpsEventContent instance that represents the template, you can introduce a separate C# class that represents the sheet structure as the item type for the config library and implement the interface ILiveOpsEventTemplate<TContentClass> in that class.
Once you've built and published the game config containing the new template library for the event, the event creation form will give you the option of choosing one of the presets as the basis for a new event instance. Choosing a preset from the dropdown auto-fills the current Event Configuration form on the sheet, but allows further tweaking of individual configuration properties. Note that the game configs are only read at the time that the event is created and the template values are copied into the resulting instance rather than being referred to from the configs. This means that any edits to the event templates will not be propagated to already-live events!
When creating an event in the LiveOps Dashboard, you can choose to set a schedule for it, with the Enable Schedule toggle. A scheduled event will start and end automatically at the specified times.
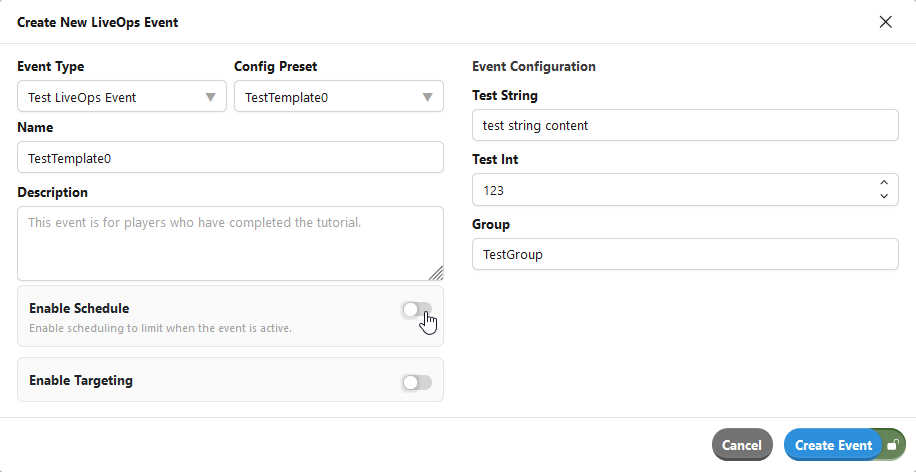
In addition to start and end times, the schedule can contain optional "preview", "ending soon", and "review" phases. The meaning of these optional phases is up to the game code. An event's phase is available in the Phase property of PlayerLiveOpsEventModel.
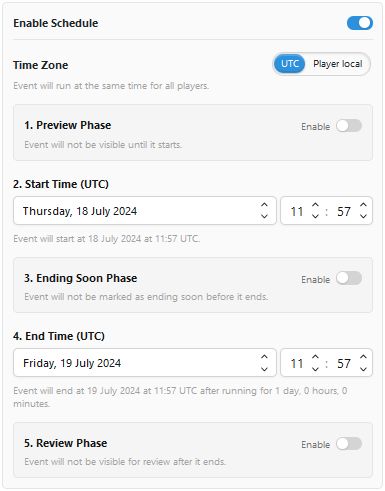
You can have your UI consult these phases to display different information to the players, like advertising an event starting soon while in the 'preview' phase, incentivizing the player to try to complete the event's contents in the 'ending soon', or showing event results in the 'review' phase.
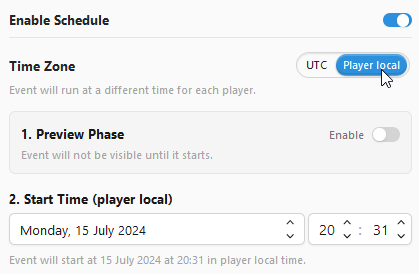
The schedule's times can be either in UTC or player-local. A UTC event happens at the same global time for all players, which means a different local time for players in different time zones. In contrast, a player-local event happens at a specific local time for each player, which means different global times for players in different time zones.
An event can also be created without a schedule. It will start right away and will run indefinitely until you conclude it manually with the Conclude button on the event's page. This takes it to the Concluded phase, the same as if it had a schedule and ended.
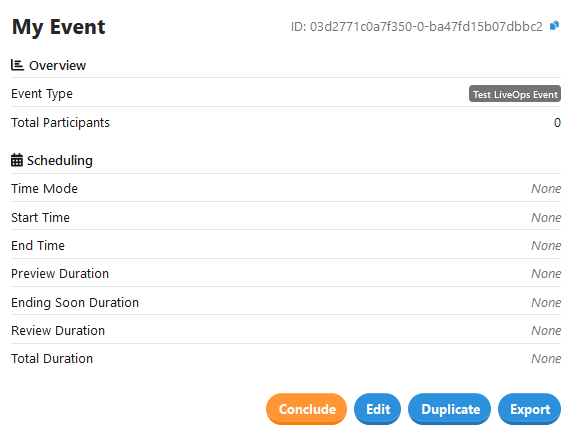
Another way to end an event that was originally created without a schedule is to edit it to add a schedule, with an appropriate end time.
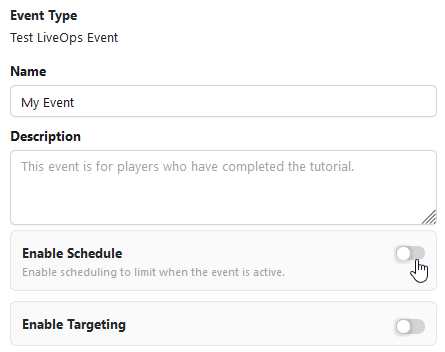
By enabling the Enable Targeting toggle in the event form, you can target events to specific audiences, in the same way as other LiveOps features such as broadcasts. See Using Segments for Audience Targeting for more information about audience targeting.
A player's membership in an event's audience is considered when deciding whether the player should join the event. After a player has already joined the event, the player will not leave the event even if the player stops being in the target audience. If you need to account for audience membership changes during an ongoing event, you can do that by overriding LiveOpsEventContent.AudienceMembershipIsSticky to false, and reading the PlayerLiveOpsEventModel.PlayerIsInTargetAudience property in your game code. By default, AudienceMembershipIsSticky is true, and PlayerIsInTargetAudience does not get updated.
By default, the generated UI in the LiveOps Dashboard will adapt to the C# types in the LiveOpsEventContent class and provide generic input components suitable for the type. You can further restrict the data allowed by attributes on your C# class members or even completely override these input components to suit your needs, as described in the Working with Generated Dashboard UI page.
Additionally, we recommend implementing rigorous validation for event configurations by overriding the LiveOpsEventContent.Validate() function and using it to check that the inputs are legal in the context of your game implementation. This validation function gets called interactively by the LiveOps Dashboard edit form to show illegal configuration live.
Besides the Working with Generated Dashboard UI page mentioned above, you can take a look at Advanced LiveOps Events Integration for tips on how to further integrate the game events into your gameplay, like adding popups to collect rewards and timers that track when an event starts or ends.