
Appearance
Using the LiveOps Timeline
The LiveOps Dashboard uses a timeline view for monitoring and interacting with various time-related items, such as LiveOps events.
The LiveOps Dashboard uses a timeline view for monitoring and interacting with various time-related items, such as LiveOps events.
WIP
This article is a work in progress as the timeline feature is still in active development. We are constantly adding new types of data to the timeline as well as improving the ways that you can interact with that data.
Running the LiveOps Dashboard locally - To follow along with this page, you should have access to an instance of the LiveOps Dashboard running on your local machine. Check out the Developing the LiveOps Dashboard guide for more details.
Knowledge of time-based events within the Metaplay SDK - The timeline visualizes several different types of time-based data, including LiveOps events, in-game offers, config-driven events, league seasons and scan jobs. Familiarity with these concepts will help you to understand the information that the timeline presents.
The LiveOps Timeline is a component in the dashboard that can display various time based items, such as LiveOps game events and player broadcasts. The timeline not only shows you LiveOps related events but also server events, such as scan jobs. This can be useful in scheduling events or debugging issues with server performance during events.
Some types of items, like LiveOps events, show up on the timeline automatically, but some types need to be explicitly configured. See Configuring Offer Groups for the Timeline and Configuring Config-Driven Events for the Timeline.
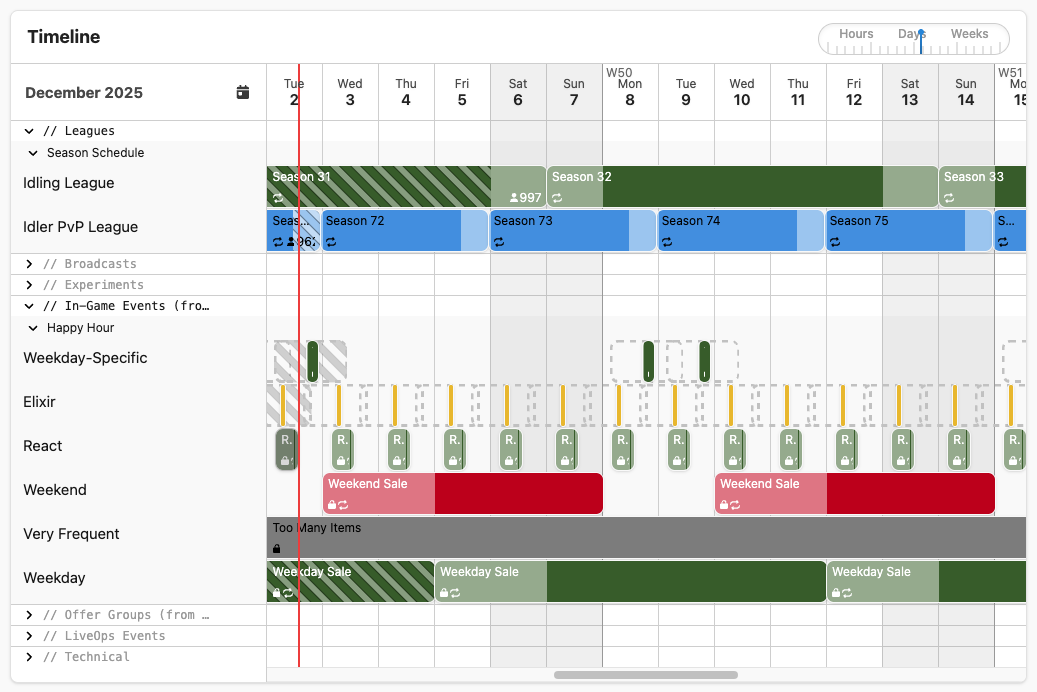
The timeline can be found on many pages of the dashboard that deal with time-related items: LiveOps Events, leagues, scan jobs, offers, your custom config-driven game events and more. Timeline items appear on rows. Rows are collected together into groups, and groups are collected into sections. These top level sections are based on the different types of items mentioned before.
You can click on sections and groups to expand or collapse them to hide content you're not interested in. The timeline always contains the same sections, no matter which page it is on, but we automatically collapse the less relevant sections by default.
Since time extends forever and the timeline is only a small window, the timeline will stream in new data from the server as you scroll left and right. You can do this by using the scroll bar, by clicking and dragging on the timeline or by using the left and right mouse wheel scroll.
You can also zoom in and out to show a smaller or larger time window. Zooming can be achieved by using the dedicated zoom control in the top right of the timeline, by clicking on the date header bar or by using the up and down mouse wheel scroll in the date header bar.
Finally, you can click on any element (event, scan job, etc.) on the timeline to open an inspector that shows details about the element.
Items on the timeline can include one or more icons:

The icons have the following meanings:
You can always hover your mouse over an icon to see a tooltip that explains its meaning.

Some types of timeline items, such as LiveOps Events, can be scheduled in either UTC or player-local time. UTC events have specific global start and end times, but player-local events happen at different times for different players. The timeline displays player-local events with a ghosted outline extending to the left and right by the maximum possible time zone offsets (14 hours to the left and 12 hours to the right). In other words, this shows the time span where the event may be active at least in some time zones. When two player-local events are next to each other, this can cause them to appear to overlap, even if they do not actually overlap for any given player.
Events implemented as documented in Implementing LiveOps Events can be organized directly on the timeline. Sections other than LiveOps Events are predefined in C# code or in Game Configs, and cannot be edited directly on the timeline.
To create a new group, hover over the LiveOps Events section and click the plus button. Similarly, to create a new row, hover over a group and click the plus button. Groups and rows can be removed with the trash bin icon. However, the group or row must be empty before it can be removed, and the initial row called Default Row cannot be removed, because that's where LiveOps Events go initially when created.
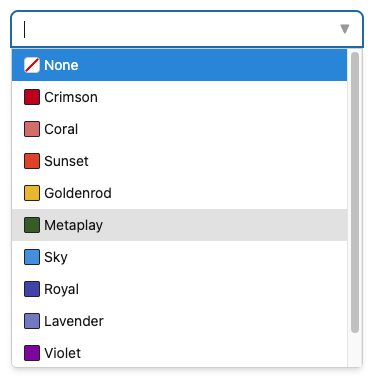
You can move groups and rows up and down or change their name via the inspector. Hover over the group or row and click on the cogwheel icon. In the inspector, you will find "Move Up" and "Move Down" buttons and a text field to edit the name. For groups, you can also assign a color.
You can also move the events themselves up and down to different rows. This likewise happens in the inspector. For events, you can open the inspector by clicking on the event on the timeline. An event's name and color can also be changed, but for now you need to do that via the Edit button on the LiveOps Event details page (reachable via the "View Event" button in the inspector).
Offer groups with a schedule, documented in Getting Started with In-Game Offers, can be configured to show up on the timeline. This is done in the game configs. You need to define the name of the row you want an offer group to appear on. You can also define a color.
You can add columns Timeline.Row and Timeline.Color in your existing offer group config sheet.
| GroupId #key | DisplayName | Timeline.Row | Timeline.Color | Placement | Priority | Offers[0] | ... | Schedule.Start.Date | ... |
|---|---|---|---|---|---|---|---|---|---|
| MondayPack | Monday Pack | Weekdays | Shop | 1 | SmallGemPack | ... | 2021-10-04 | ... | |
| TuesdayPack | Tuesday Pack | Weekdays | Shop | 1 | SmallGemPack | ... | 2021-10-05 | ... | |
| WeekendSaleDefault | Weekend Sale (default) | Weekend Sale (default) | #aabbcc | Shop | 2 | SmallGemPack | ... | 2021-10-02 | ... |
| WeekendSaleUpsell | Weekend Sale (upsell) | Weekend Sale (upsell) | Goldenrod | Shop | 1 | LargeGemPack | ... | 2021-10-02 | ... |
Timeline.Row is required in order for the offer group to show up. It defines the name of the row on the timeline. You can put multiple offer groups on the same row by giving them the same row name. Here, MondayPack and TuesdayPack are on the same row.
For offer groups with a recurring schedule, each occurrence is shown as its own item on the timeline. Offer groups without a schedule are not shown, as they are potentially always enabled (depending only on targeting conditions or non-calendar-based timing).
Timeline.Color is optional. It can be either a hexadecimal RGB color like #a1c or #ab16c5, or one of the predefined color names the timeline supports. The predefined colors are the same that can be seen in the color selection dropdown in the timeline group inspector:
If you have implemented config-driven events (as documented in Implementing Config-Driven Game Events), you can set up timeline visualizations for them. Besides events, this works the same way for any other activables you may have implemented (with config data types implementing the IMetaActivableConfigData<...> interface).
First, make sure you have the Timeline property in your IMetaActivableConfigData type and its corresponding IGameConfigSourceItem implementation:
[MetaSerializable]
public class HappyHourInfo : IMetaActivableConfigData<HappyHourId>
{
    ...

    [MetaMember(...), ServerOnly] public MetaActivableTimelineSettings Timeline { get; private set; }

    public HappyHourInfo(...)
    public HappyHourInfo(..., MetaActivableTimelineSettings timeline)
    {
        ...
        Timeline = timeline;
    }
}

public class HappyHourSourceConfigItem : IGameConfigSourceItem<HappyHourId, HappyHourInfo>
{
    ...

    public MetaActivableTimelineSettings Timeline;

    public HappyHourInfo ToConfigData(GameConfigBuildLog buildLog)
    {
        return new HappyHourInfo(
            ...);
            ...,
            timeline: Timeline);
    }
}
Now, you can add the Timeline.Row and Timeline.Color columns in your event's config sheet and configure them the same way as offer groups, as described in Configuring Offer Groups for the Timeline.