
Appearance
Skip to content This article will guide you through integrating the Metaplay SDK package into your existing Unity game project and running the local backend.
Dependencies
To get the most out of this guide, we suggest you complete the following steps first:
- Metaplay overview - You should have a general idea of what problems we solve for you in the world of game backends. When in doubt, have a look at the Introduction to Metaplay page!
- Metaplay SDK - If you haven't already, please download the latest Metaplay SDK from the developer portal. You will need the SDK to follow along with this guide.
What Is In the Package
The Metaplay SDK is delivered as a zip archive containing full source code for the SDK's components. The package is structured in a way that allows embedding the package in your Unity game project by unpacking it into the game project directory tree.
The game client, game server, and LiveOps Dashboard builds will be set up to refer to source files within the Metaplay SDK directly to make configuring the builds, debugging, and potentially doing modifications to the Metaplay SDK just as easy as if it was your own code!
This is what the inside of the package looks like:
text
MetaplaySDK
+---Client
¦   +---Core
¦   +---Unity
¦   +---package.json
¦   +---...
+---Backend
¦   +---Cloud
¦   +---Server
¦   +---BotClient
¦   +---...
+---Frontend
+---...
MetaplaySamples
+---HelloWorld
+---Idler
+---...MetaplaySDK/Client/contains the C# code used by the game client. The folder contains apackage.jsonfile compatible with the Unity package manager for conveniently introducing the Metaplay SDK into your Unity project as a local package reference.MetaplaySDK/Backend/is the home for backend-only C# code. In addition to the code for building the game server, you will find tools for testing and deploying your backend here.MetaplaySDK/Frontend/contains our SDK's re-usable Node.js packages that are used by the LiveOps Dashboard along with a fully working default LiveOps Dashboard project underDefaultDashboard.MetaplaySamples/contains the samples to be used as a reference for integrating various Metaplay features in your game. The entries under theMetaplaySamples/folder are self-contained Unity projects complete with integrated Metaplay SDK backend components. TheHelloWorldsample serves the special purpose of being a convenient starting point for your own integration.
Quick Install Guide
These steps will guide you through adding the Metaplay SDK to your Unity game project and getting started with building and running the game server locally.
Assumptions:
- You have the Metaplay SDK release package.
- You have an existing Unity project and you know your way around the Unity editor. Unity version 2022.3 or newer is recommended.
- You have .NET 8 SDK or Visual Studio 2022 or later installed.
Adding the Metaplay Unity SDK to Your Unity Project
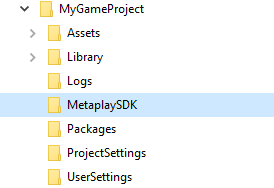
Extract the contents of the release package into your project root.
In Unity Editor, open the package manager from the menu Window → Package Manager.
Add the
MetaplaySDK/Client/folder as a local package- Click on the "+" icon in the top left corner.
- Choose "Add package from disk..."
- Navigate to
MetaplaySDK/Client/and selectpackage.json.
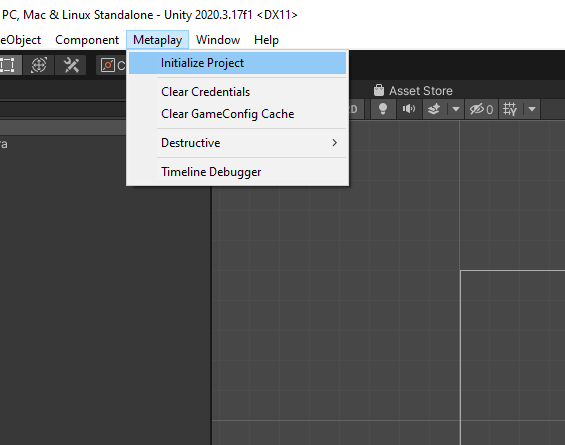
Run Metaplay project initialization by clicking on Metaplay → Initialize Project in the Unity menu.
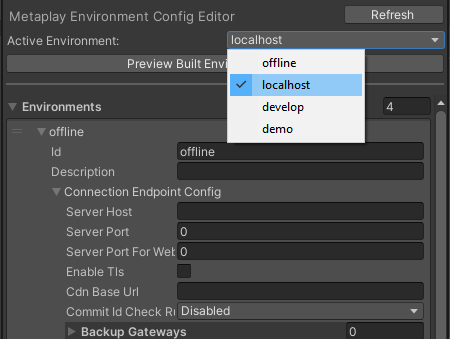
You should now have a fully functional minimal Metaplay SDK integration in your Unity project. To verify that everything went smoothly, open the MetaplayHelloWorld/HelloWorldScene imported into your project, set your active environment to 'offline' in the environment configs editor ('Metaplay/Environment Configs'), and hit play. This will run the minimalistic Hello World game logic in "offline server" -mode.
The following files get added to your project to give you a head start with setting up the basic integration:
text
Assets/
+---MetaplayHelloWorld/     Metaplay's HelloWorld sample project.
+---SharedCode/             Game files shared by the client and server.
|   +---GlobalOptions.cs    Metaplay project configuration, customize to your game.
|   +---Player/*.cs         Game logic placeholders. Implement your logic here.
StreamingAssets/
+---SharedGameConfig.mpa    Pre-built game config files.
Backend/                    Game-specific backend files.
+---Server/                 Game server C# project.
The MetaplayHelloWorld/ directory can be removed when no longer needed, but the following files can be still be useful as-is or as references when making your own versions:
ApplicationStateManager.csimplements the lifecycle of a Metaplay-powered application, including connectivity handling and network errors.Editor/UnityGameConfigBuilder.csimplements the game-specific game config data build pipeline. See Introduction to Game Configs for more information.
TIP
Pro tip: We strongly recommend disabling Domain Reload in your Unity project, if possible. This makes iterating much smoother as entering play mode becomes much faster.
DANGER
Compatibility Warning: If you are using Unity's new Input System module, please note that the included 'Click me' button in the HelloWorldScene will not work as it uses the old input system. You can enable both old and new input systems at the same time from Unity if you want to try out the button.
Running the Game Server
Your project now contains a fully-featured game server under the Backend/ directory that you can easily run on your local machine. Give it a go:
- On Windows, using Visual Studio
- Open the server solution in Visual Studio, located under the
Backend/directory and named<project>-Server.sln. - Make sure the
Serverproject is selected as the startup project (in Solution Explorer, right-click onServer, and choose Set as StartUp Project). - Press Ctrl+F5 to start the server.
- Open the server solution in Visual Studio, located under the
- On Windows, using the command line
- Use your command line to navigate into the
Backend/Serverdirectory. - Run
dotnet runto start the backend. - Press
Qto gracefully stop the backend.
- Use your command line to navigate into the
- On macOS, using Visual Studio for Mac
- Open the 'Visual Studio for Mac' installation that came with Unity and check for updates to get the very latest version.
- Open the server solution in Visual Studio fo Mac, located under the
Backend/directory and named<project>-Server.sln. - Make sure the
Serverproject is selected as startup project. - Run the project by pressing the play button or by selecting Run/Start Debugging.
- During your first run you may get permission popups on newer versions of MacOS. Terminal access is required to run the backend.
- Press the stop button or press
qin the terminal window to stop the backend.
- On macOS, using Terminal.app
- Navigate to the project folder and then to the
Backend/Serversubfolder in your terminal app. - Run
dotnet runto start the backend. - Press
qto stop the backend.
- Navigate to the project folder and then to the
With the game server now running, we can connect the game client to it in Unity. Open the environment configs editor under Metaplay/Environment Configs and set 'Active Environment' to 'localhost'.
Hitting play will now form a connection to your locally running game server.
INFO
Check it out! You can now view the LiveOps Dashboard at http://localhost:5550 when the server is running.
Configuring the Project's Identity
Let's do some final configuration to give your project its own identity by specifying the project name and 4-character game magic:
Assets/SharedCode/GlobalOptions.cs
C#
// Let's give the project the name 'MyProject' and set the 4 letter magic to 'MYPR'.
public MetaplayCoreOptions Options { get; } = new MetaplayCoreOptions(
    projectName: "MyProject",
    gameMagic: "MYPR",
    ...
Managing the Application Lifecycle
The ApplicationStateManager.cs copied from the Hello World sample implements the basic state management and transitions that are needed in a typical game, including Metaplay SDK initialization, connecting to the server, and handling of connection errors.
If you already have your own state manager or want to build your own, you can use the ApplicationStateManager as a reference on how to integrate Metaplay into your state manager.
Alternatively, you may also use ApplicationStateManager as a starting point for building your own and extend it to handle game-specific behavior, such as loading the game's assets and doing scene transitions.
Further Reading
After you have successfully integrated the Metaplay SDK, you should start understanding how Metaplay’s programming model works so you can prepare yourself and start working on your game. We recommend you stop by Introduction to Metaplay’s Programming Model to get a primer, and later go over to Tutorial: Game Logic for a more hands-on introduction.
For more information on configuring your client for different environments, take a look at Environment Configs.