
Appearance
Tutorial: LiveOps Features
Use game configs to implement A/B testing, segmentation, and LiveOps events into your game.
Use game configs to implement A/B testing, segmentation, and LiveOps events into your game.
In the previous Tutorial: Game Configs chapter, we set up OTA game configs for our project. Now that the game is data-driven, we can continue adding player segmentation, A/B testing, and the LiveOps events feature for dynamic game content.
To keep the tutorial focused, we will not dive deep into the SDK features themselves. Here are the concepts we'll be applying in this chapter, along with links for further reading if you're curious:
Now that we have a way to configure the game, we can move on to implementing player segmentation.
Segments in Metaplay are built from a set of PlayerPropertys. At it's simplest, a PlayerProperty is a scriptable way to fetch data about your player. The SDK combines sets of player properties to compare and evaluate against the player model. Segments can then be used in a variety of SDK features, from A/B testing to push notifications, but you can also use segments in your own features.
The end goal is to have segments be configurable via game configs, so that no code changes or server builds are needed to add new segments.
Before we get started creating segments, we have to create a new section in the game configs. Add a new library to the SharedGameConfig:
public class SharedGameConfig : SharedGameConfigBase
{
    [GameConfigEntry("TrackConfig")]
    public TrackConfig TrackConfig { get; private set; }

    [GameConfigEntry("Shop")]
    public GameConfigLibrary<ShopId, ShopItem> Shop { get; private set; }

    [GameConfigEntry("PlayerSegments")]
    [GameConfigEntryTransform(typeof(DefaultPlayerSegmentBasicInfoSourceItem))]
    public GameConfigLibrary<PlayerSegmentId, DefaultPlayerSegmentInfo> PlayerSegments { get; private set; }
}
The simplest player property just returns a value and has a display name. The SDK handles all the grunt work of comparisons and further evaluation. Let's create a player property that returns the total amount of soft currency a player currently has:
[MetaSerializableDerived(4)]
public class SoftCurrencyProperty : TypedPlayerPropertyId<int>
{
    public override string DisplayName => "Soft Currency";
    public override int GetTypedValueForPlayer(IPlayerModelBase player) => ((PlayerModel)player).PlayerData.NumCoins;
}
More complex player properties are possible as well. For example, RunsWithTheme takes a parameter to determine how many runs the player has completed with a specific theme. These work with a bit of custom parsing logic that turns RunsWithHistory/Night into a new instance of RunsWithTheme with Theme set to Night. For more info, check out Defining Player Properties.
[MetaSerializableDerived(7)]
public class RunsWithThemeProperty : TypedPlayerPropertyId<int>
{
    public override string DisplayName => $"Number of completed runs with theme {Theme}";

    [MetaMember(1)] public string Theme { get; set; }

    public override int GetTypedValueForPlayer(IPlayerModelBase player)
    {
        PlayerModel playerModel = (PlayerModel)player;
        return playerModel.RunHistory.Count(x => x.ThemeUsed == Theme);
    }
}
Add all the player properties you might need at this point. We have added a few more that were appropriate for the Trash Dash project, but these will be very game-specific. You can always add more later!
With player properties defined, we can then create segments in the new PlayerSegments game config library.

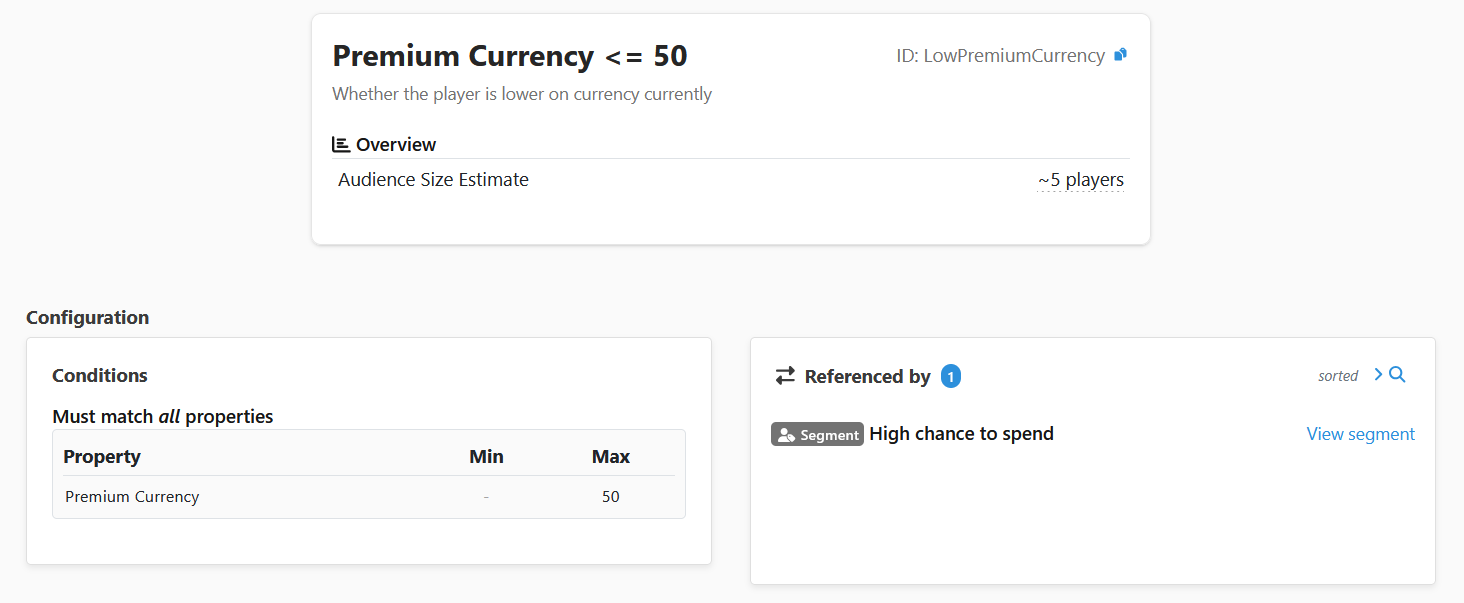
PropMin and PropMax
Numeric and time properties (such as Gold or AccountAge) are checked against ranges specified by the PropMin and PropMax columns. For less than or greater than behavior, either PropMin or PropMax can be omitted. Non-numeric properties (such as LastKnownCountry, a string) are not range-compared; instead, the PropMin column is repurposed to contain the required value. The PropMax column is not used for non-numeric Properties.
You can use the LiveOps Dashboard to see all your defined segments and what segments any given player belongs to. This makes debugging segments a breeze!
metaplay dev server.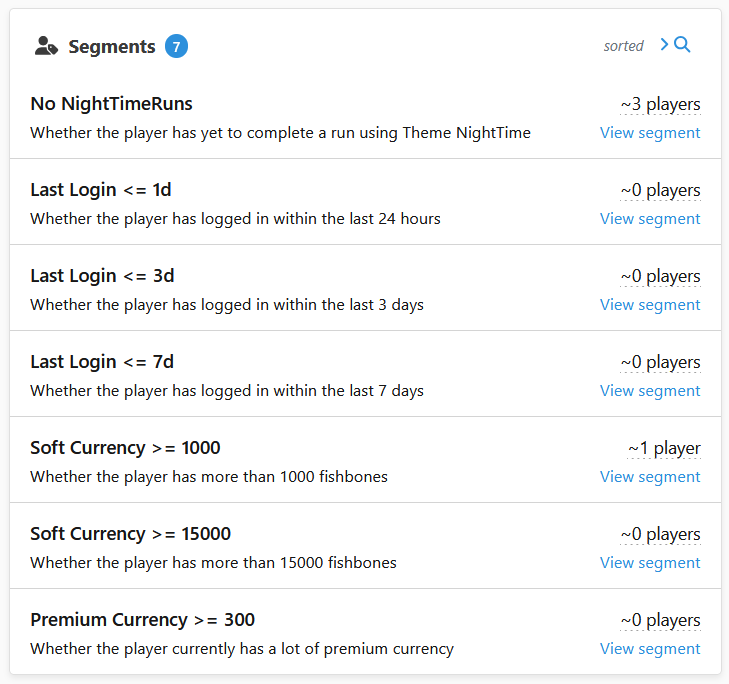
You can also visit the Player Segments page at http://localhost:5550/segments to see an overview of all configured segments.
Now that we have over-the-air configuration and segments, we can use the experiments feature of Metaplay's game configs system to add A/B tests to the game.
This time, we'll need to add a PlayerExperiments library to the ServerGameConfig (instead of SharedGameConfig), to ensure that your experiments are not leaked to all your players.
Create a new file ServerGameConfig.cs in the SharedCode directory, and define a new class inheriting from ServerGameConfigBase with an entry PlayerExperiments:
public class ServerGameConfig : ServerGameConfigBase
{
[GameConfigEntry(PlayerExperimentsEntryName)]
public GameConfigLibrary<PlayerExperimentId, PlayerExperimentInfo> PlayerExperiments { get; private set; }
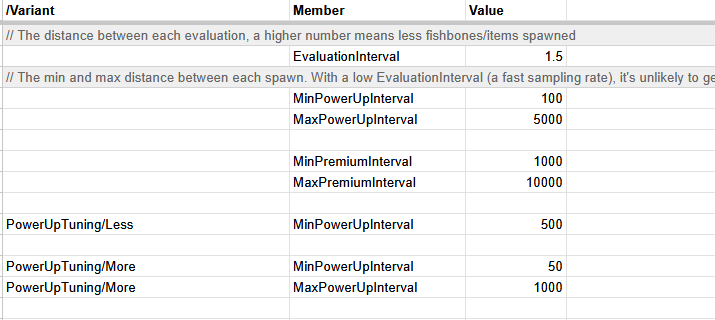
}We will configure three experiments in the PlayerExperiments game config library, and assign new values to TrackConfig when a player is enrolled in an experiment. Each experiment will have a control group and two variant groups.
In this example, we've overwritten the power up spawn rates for the PowerUpTuning experiment.
Note how there are no further code changes required in this step as experiments are configured in the existing game configs! The client or server do not need any additional code to support experiments. The Metaplay SDK will handle all the work of fetching the correct experiment configuration and keeping it in sync on both the server and client.
The 3 new experiments in the game config are:
Experiments are a powerful feature that can get complicated in large games. This is a positive problem of having a successful game with lots to test!
We have built a lot of quality-of-life tooling into the LiveOps Dashboard to help manage a large amount of parallel experiments.
Premium Currency <= 50 segment.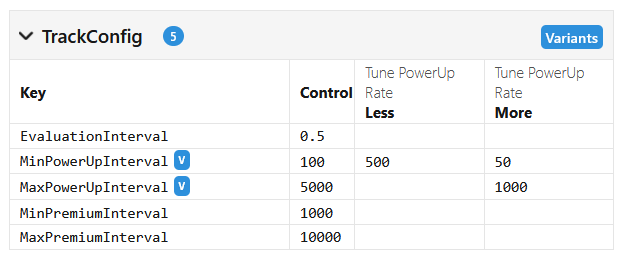
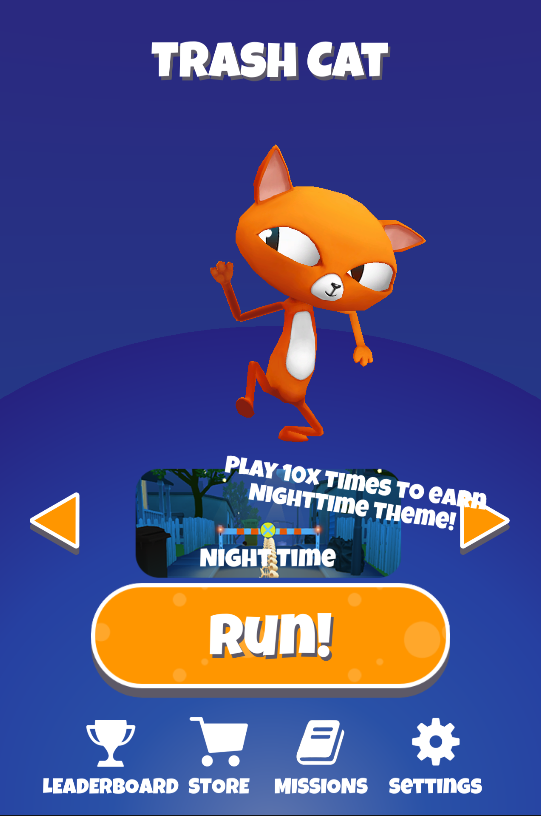
To take more advantage of segments and targeting, we will next implement a dynamic in-game event using Metaplay's LiveOps event system. The event will temporarily enable the night theme for players, and give them a chance to permanently unlock the night theme if they play enough times.
LiveOps events usually consist of 2 different components: configuration (LiveOpsEventContent) and the player specific state (LiveOpsEventModel). We'll set this up in a re-usable fashion, the same implementation can be used if we add new themes to the game. The event content will contain the theme we're enabling, how many times the player has to attempt the theme to unlock the theme permanently, and a title to show in the game.
Define a new class inheriting from LiveOpsEventContent:
[LiveOpsEvent(1)]
public class ThemeEvent : LiveOpsEventContent
{
    [MetaMember(1)]
    [MetaFormDisplayProps("Theme", DisplayHint = "Which theme to enable for the users")]
    [MetaFormFieldCustomValidator(typeof(ThemeValidator))]
    public Theme Theme { get; private set; } = Theme.NightTime;

    [MetaMember(2)]
    [MetaFormDisplayProps("Perma Unlock Threshold", DisplayHint = "After how many runs the player will permanently unlock this theme")]
    public int PermaUnlockThreshold = 10;

    [MetaMember(3)]
    [MetaFormDisplayProps("Event In-Game Title", DisplayHint = "Event title in Game UI")]
    public string EventInGameTitle;
}
The configuration will be shown in the dashboard using Metaplay's Generated UI framework, we've used optional attributes MetaFormDisplayProps and MetaFormFieldCustomValidator to make the form more user-friendly.
Next, define the player specific state:
[MetaSerializableDerived(1)]
public partial class ThemeEventModel : PlayerLiveOpsEventModel<ThemeEvent, PlayerModel>
{
    [MetaMember(1)] public int RunsInThemeSinceStart { get; private set; }

    [MetaMember(2)] public bool RewardGiven { get; private set; }

    public void IncrementRunAndReward(PlayerModel player, string themeUsed)
    {
        if (Content.Theme.ToString() == themeUsed)
        {
            RunsInThemeSinceStart++;

            if (RunsInThemeSinceStart >= Content.PermaUnlockThreshold && !RewardGiven)
            {
                RewardGiven = true;
                if (!player.PlayerData.Themes.Contains(themeUsed))
                {
                    player.PlayerData.Themes.Add(themeUsed);
                }
            }
        }
    }
}
That's all you need for the event to show up in the dashboard and be able to enroll players into the event.
Next, let's update the client to show the event.
Invoke IncrementRunAndReward() from the EndRunAction:
foreach (var model in player.LiveOpsEvents.EventModels.Values.OfType<ThemeEventModel>().Where(x=>x.Phase.IsActivePhase()))
{
    model.IncrementRunAndReward(player, ThemeUsed);
}
We'll use a client listener to sync the event becoming active/inactive to the UI.
Add a new method to the client listener interface:
public interface IPlayerModelClientListener
{
    void ThemeEventChanged();
}
Invoke the client listener when the event model's phase changes:
public partial class ThemeEventModel : PlayerLiveOpsEventModel<ThemeEvent, PlayerModel>
{
    protected override void OnPhaseChanged(PlayerModel player, LiveOpsEventPhase oldPhase, LiveOpsEventPhase[] fastForwardedPhases,
        LiveOpsEventPhase newPhase)
    {
        player.ClientListener.ThemeEventChanged();
    }
}
Lastly, implement the client listener and hook up the UI to enable/disable the theme when the phase changes:
public partial class MetaplayService : IPlayerModelClientListener
{
    public static Action NotifyThemeEventChanged;

    public void ThemeEventChanged()
    {
        NotifyThemeEventChanged?.Invoke();
    }
}void OnEnable()
{
MetaplayService.NotifyThemeEventChanged += RefreshThemeUI;
}
void OnDisable()
{
MetaplayService.NotifyThemeEventChanged -= RefreshThemeUI;
}With the events implemented, you can now use the LiveOps Dashboard to create and manage them.
metaplay dev server.ThemeEvent, fill in a name, and optionally set a schedule and/or segment for targeting. Save the event.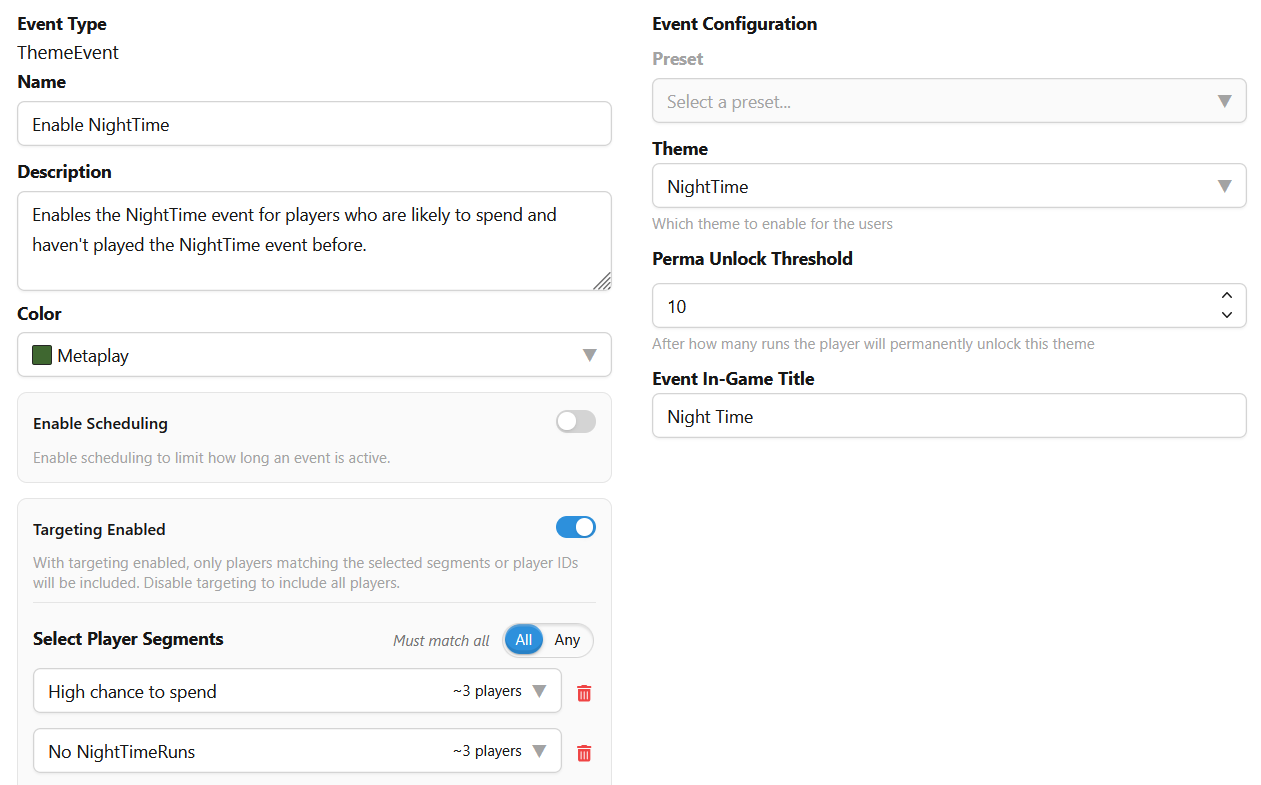
We have now implemented Metaplay's game configs and used it to power the segmentation, experiments and LiveOps events features. At this point, our game is over-the-air configurable and ready for a more complex LiveOps workflows without client updates.
We could stop the tutorial here and focus on expanding the new systems we've implemented. However, we will continue with one more chapter to add a bit of polish to the game that makes it more interesting to look at.