
Appearance
Working with Game Configs
Metaplay's game configs are a data-driven way to specify the game's design economy and localization data using external tools like Google Sheets and Excel.
Metaplay's game configs are a data-driven way to specify the game's design economy and localization data using external tools like Google Sheets and Excel.
The primary purpose of the game configs system is to extract the game's design, economy, and localization data so that it can be edited separately from the game's code, making it faster to work with and more accessible to developers with less technical backgrounds. This article explains everything you need to know to get started using it in your game.
Automatic Config Updates
If the published version of your Game Config on the server has changed, the client will automatically download them on session start. No need to set anything up!
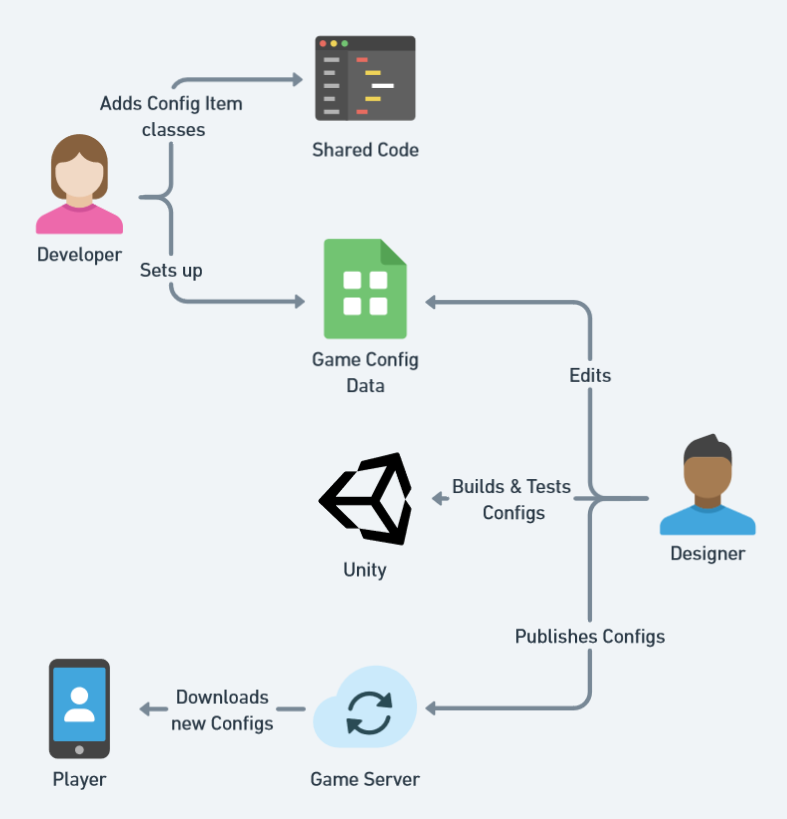
You can iterate on the game design data in a tool of your choosing (e.g., Google Sheets) and publish new configs to the players over-the-air. You can also view your game config data using the LiveOps Dashboard.
Customization Options
Game configs are a deep topic, and there are at least as many workflows as there are game studios. However, the Metaplay SDK's game configs pipeline is highly customizable and extendable beyond the basics. Look at the Further Reading section at the end of this page for proper deep dives!
The smallest unit of game config data is called a Game Config Item. Depending on how you like to model your game data, you could consider Items as individual objects in code or rows in a spreadsheet. Items can have as many properties as you like.
| Kind #key | Damage | HitPoints | Speed | ... |
|---|---|---|---|---|
| Soldier | 10 | 100 | 1.5 |
Note that the columns that specify the item's identity must have the #key tag, e.g., Kind #key in this example. Items can also have multiple columns that make up the identity, e.g., a (Id, Level) tuple, in which case both columns would have the #key tag.
You typically have collections of Items that make logical sense to group together, such as game items, heroes, cards, etc. We call them Game Config Libraries. Designers often prefer to make one spreadsheet tab per Library to keep the various Libraries and their Items neatly organized.
| Kind #key | Damage | HitPoints | Speed |
|---|---|---|---|
| Soldier | 10 | 100 | 1.5 |
| Ninja | 50 | 150 | 5.25 |
| ... |
| Type #key | Value | InventorySlot | Rarity |
|---|---|---|---|
| Dagger | 25 | Weapon | Common |
| Bread | 2 | Healing | Common |
| ... |
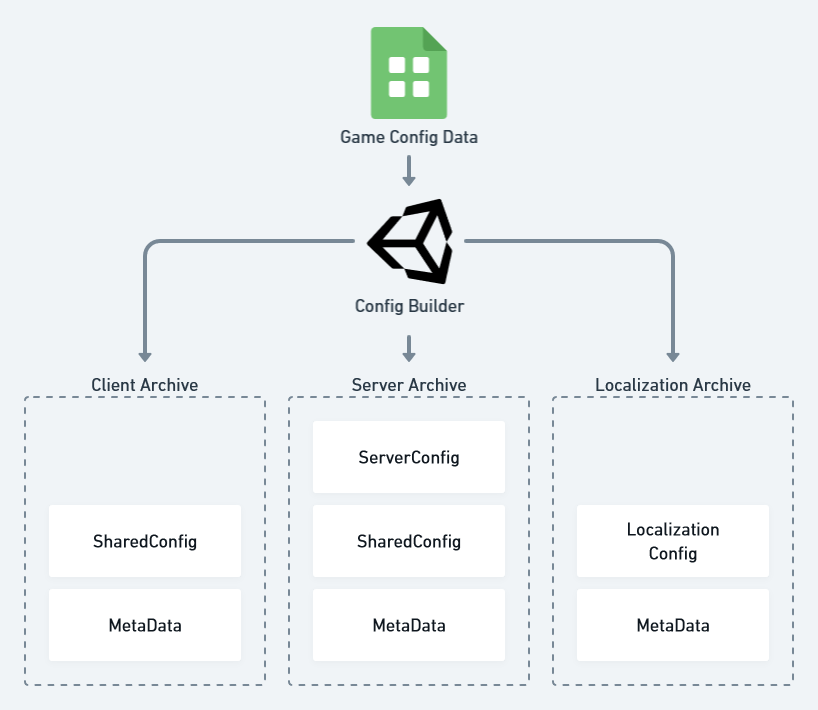
Finally, the SDK will package all your Libraries into binary files called Game Config Archives. They can be uploaded to a running server (either local or in the cloud) and published to game clients over-the-air without a separate client update or the need to reboot the game server.
Let's say you have a game with idle combat in which you improve your army by buying some troops and other combat units. Here's an overview of the initial set-up steps to make a game feature data-driven via game configs.
Keep Configs Immutable
Game Configs should not be mutated in game logic. Mutating the configs in the game logic can create non-deterministic behavior and unpredictable bugs, and even affect other players unintentionally. After the parsing stage, the configs should be read-only!
The first thing you have to do is figure out how to represent your troops in your configs. By default, we use Google Sheets, but you have other options like using other spreadsheet applications, reading from JSON or CSV, or even using Unity prefabs. For most cases, it's as simple as adding a column for each property you need and adding rows for every Item. In this case, we have a column for each attribute we want our troops to have, and we have Soldier and Ninja as our troop types.
| Kind #key | Damage | HitPoints | Speed |
|---|---|---|---|
| Soldier | 10 | 100 | 1.5 |
| Ninja | 50 | 150 | 5.25 |
After figuring out how the data will look on the spreadsheets, you should add the equivalent class to your C# code. You might have already noticed, but this class will be the template for an entire Library. This way, each Library will have distinct columns for each class member, and you’ll have different Libraries for each new C# IGameConfigData<> class you add.
// Unique string-like identifier type for TroopInfos (see below)
[MetaSerializable]
public class TroopKind : StringId<TroopKind> { }

// Configuration data for an in-game troop, identified by a TroopKind
[MetaSerializable]
public class TroopInfo : IGameConfigData<TroopKind>
{
    [MetaMember(1)] public TroopKind Kind      { get; private set; } // Unique kind (id) of troop
    [MetaMember(2)] public int       Damage    { get; private set; } // Damage dealt
    [MetaMember(3)] public int       HitPoints { get; private set; } // Hit points
    [MetaMember(4)] public F32       Speed     { get; private set; } // Movement speed (a fixed-point value)

    // Extract the key that uniquely identifies the troop
    public TroopKind ConfigKey => Kind;
}
Implementing the IGameConfigData<> interface registers the type as a class containing a Game Config Item and we can now include the Library in our shared Config.
public class SharedGameConfig : SharedGameConfigBase
{
    [GameConfigEntry("Troops")]
    public GameConfigLibrary<TroopKind, TroopInfo> Troops { get; private set; }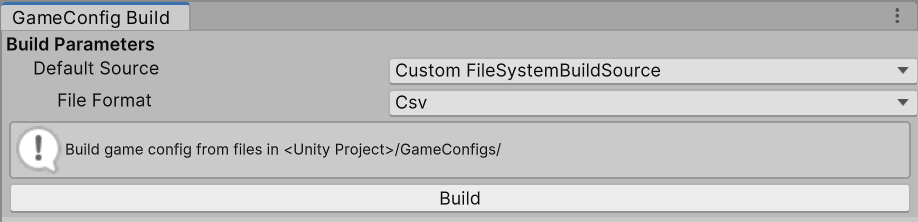
}Metaplay ships with a utility to build game configs quickly and easily. You can open the window using Menu -> Metaplay -> Game Config Build Window.
In Google Sheets, each sheet or tab of the spreadsheet corresponds to a Library specified with the [GameConfigEntry] attribute. In this example, the tab name Troops corresponds to the Troops Library, and we created a new Spreadsheet with the following contents:
| Kind #key | Damage | HitPoints | Speed |
|---|---|---|---|
| Soldier | 10 | 100 | 1.5 |
| Ninja | 50 | 150 | 5.25 |
Fill in a name and the URL to the spreadsheet in the build utility:
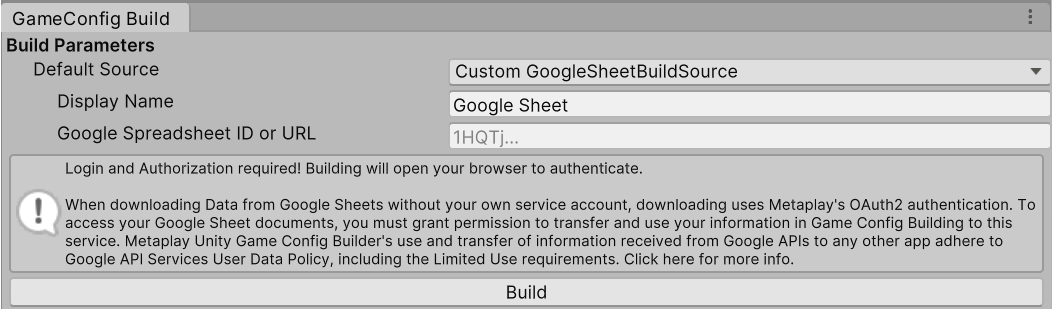
When you press Build, we'll take care of converting the data and packaging it nicely into a compressed file.
When using local CSV files, each file corresponds to a Library specified with the [GameConfigEntry] attribute. In this example, Troops.csv corresponds to the Troops Library. We created a source folder with the following contents:
| Kind #key | Damage | HitPoints | Speed |
|---|---|---|---|
| Soldier | 10 | 100 | 1.5 |
| Ninja | 50 | 150 | 5.25 |
Building will read the CSV files from Project Directory/GameConfigs/Troops.csv.
When you press Build, we'll take care of converting the data and packaging it nicely into a compressed file.
When building the StaticGameConfig Archive is complete, it is timestamped with the time of its creation, a unique version ID is generated by hashing all its contents, and the Archive is written to the disk.
When using a local server, the latest version of each Archive is loaded at the server start and distributed to the clients on connecting. When running in Offline Mode, the latest Archives are loaded on application start.
🛠️ Customize Build Pipeline
The config build pipeline can be customized to include custom sources and data processing steps. For a description of how the build steps are done and configured, see Custom Game Config Build Pipelines.
⚡ Config Hotloading
Building a Game Config will load the new Configs into the Unity editor. If you happen to be running the game client in offline mode, it will also hot-load the changes into the running game. This is great for rapid iteration.
The Metaplay SDK automatically updates the contents of SharedGameConfig and recursively updates any references in the active PlayerModel (or other models) to the updated Game Config Item classes.
🛠️ Customization Options
The UnityGameConfigBuilder of Idler is intended to be a reference for implementing the build flow, and the flows can be customized to fit each game's or team's needs. For example, many developers prefer triggering the game config builds from Unity menus, but it's also possible to invoke the builds on the server.
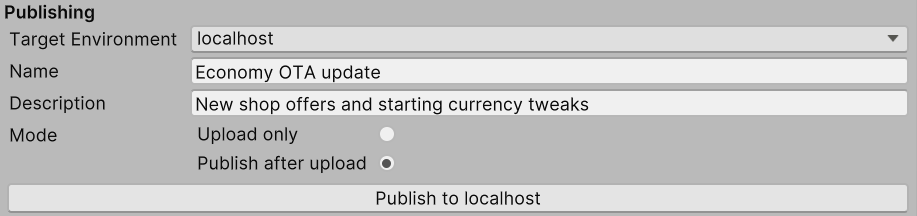
Publishing is as simple as selecting the right environment and pressing Publish. This will automatically upload the latest built game config to the environment of your choice via HTTP API.
All uploaded game configs persist in the database along with their metadata. You can also view the complete history of game configs uploaded to the server in the game's LiveOps Dashboard on the Game Configs page:
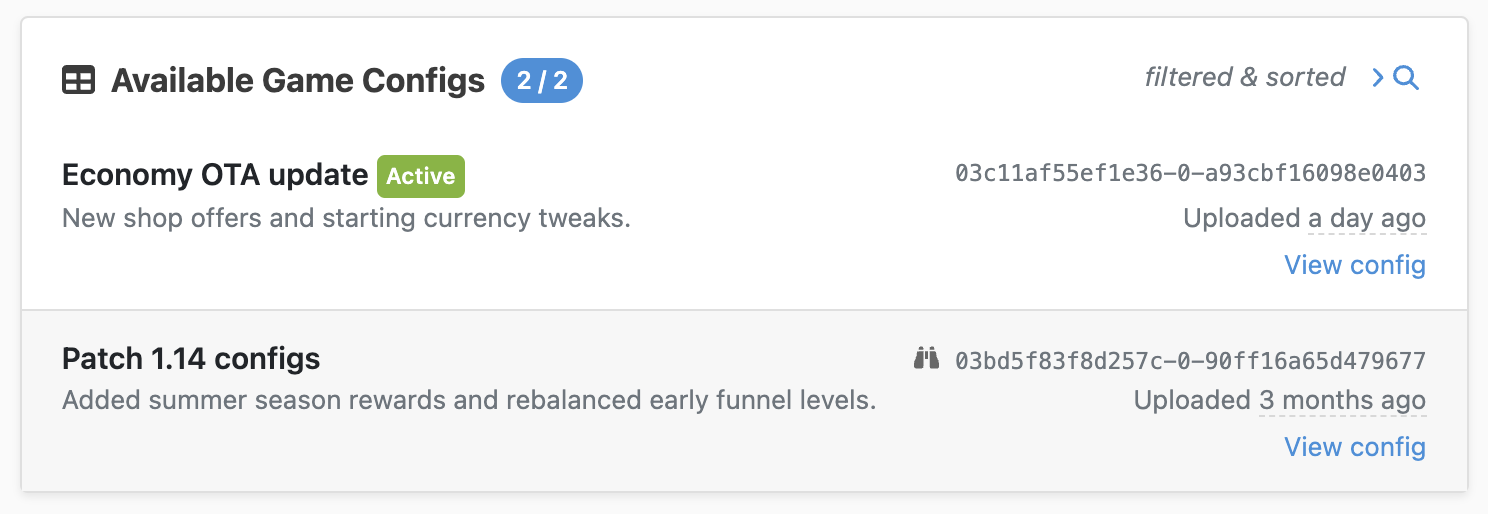
Depending on your workflow, you may want to Upload and Automatically Publish the Game Config Archive, or you may want to perform manual review before publishing the config. For more information on publishing workflows and tooling, see Managing Game Configs from the Dashboard page.
The default operation in Game Config Build Window is to Publish after upload. In this mode, uploaded Game Config Archive is published automatically after it has been uploaded the Game Config Build Window.
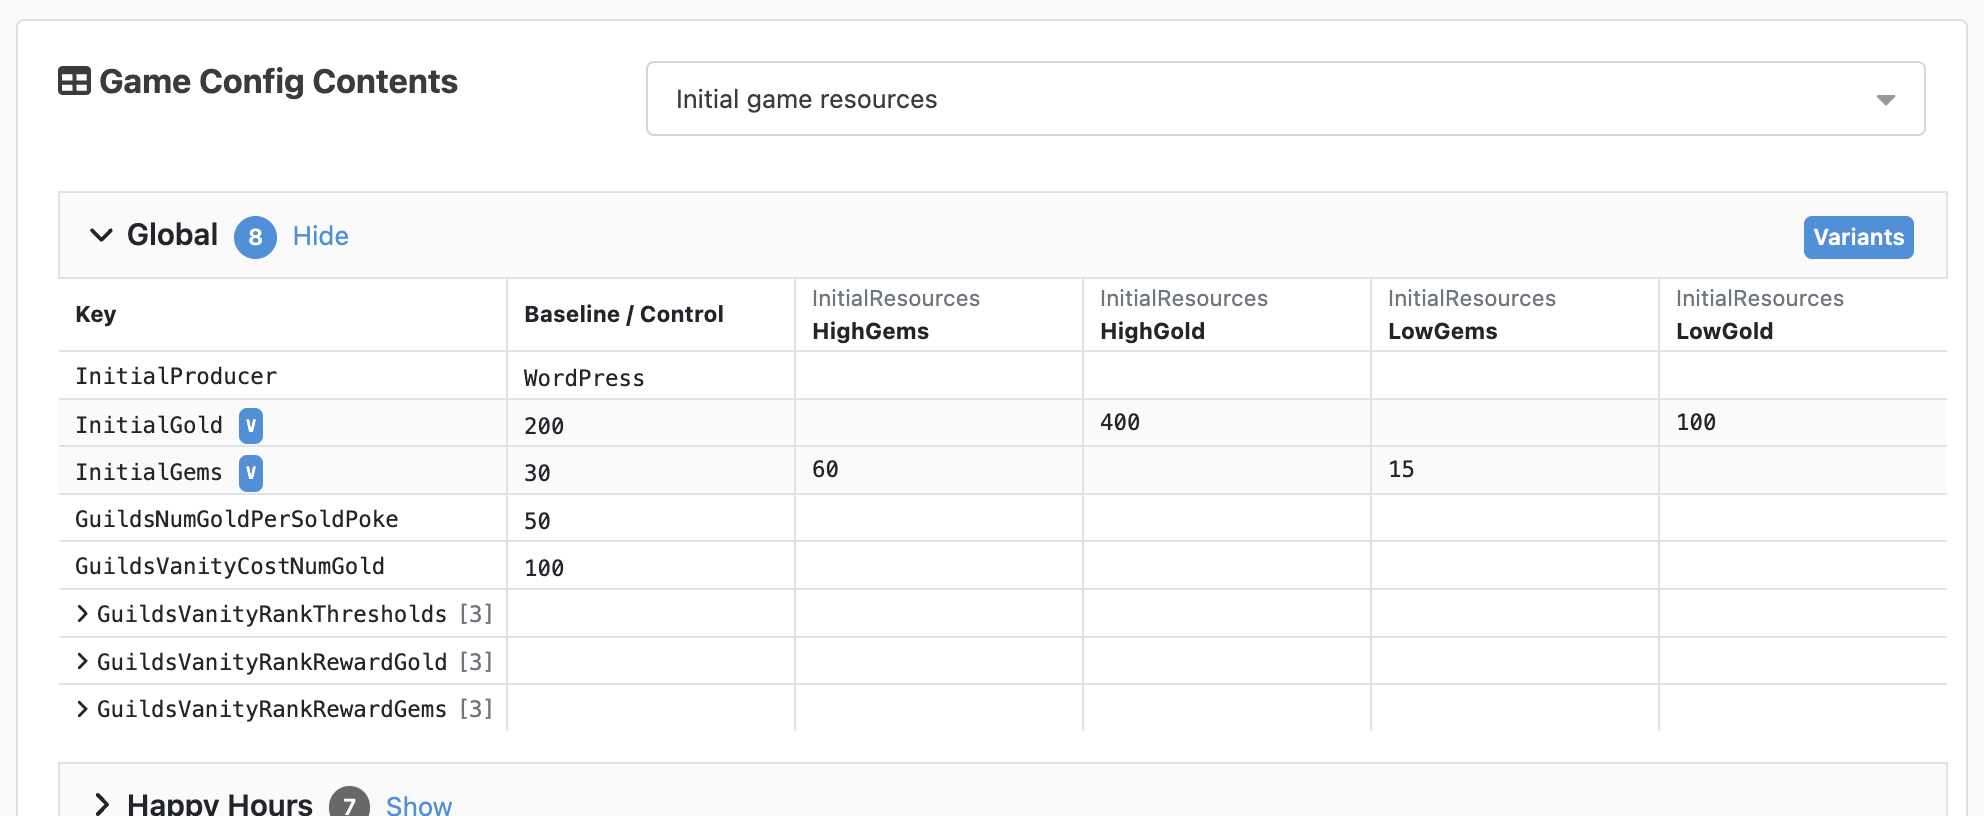
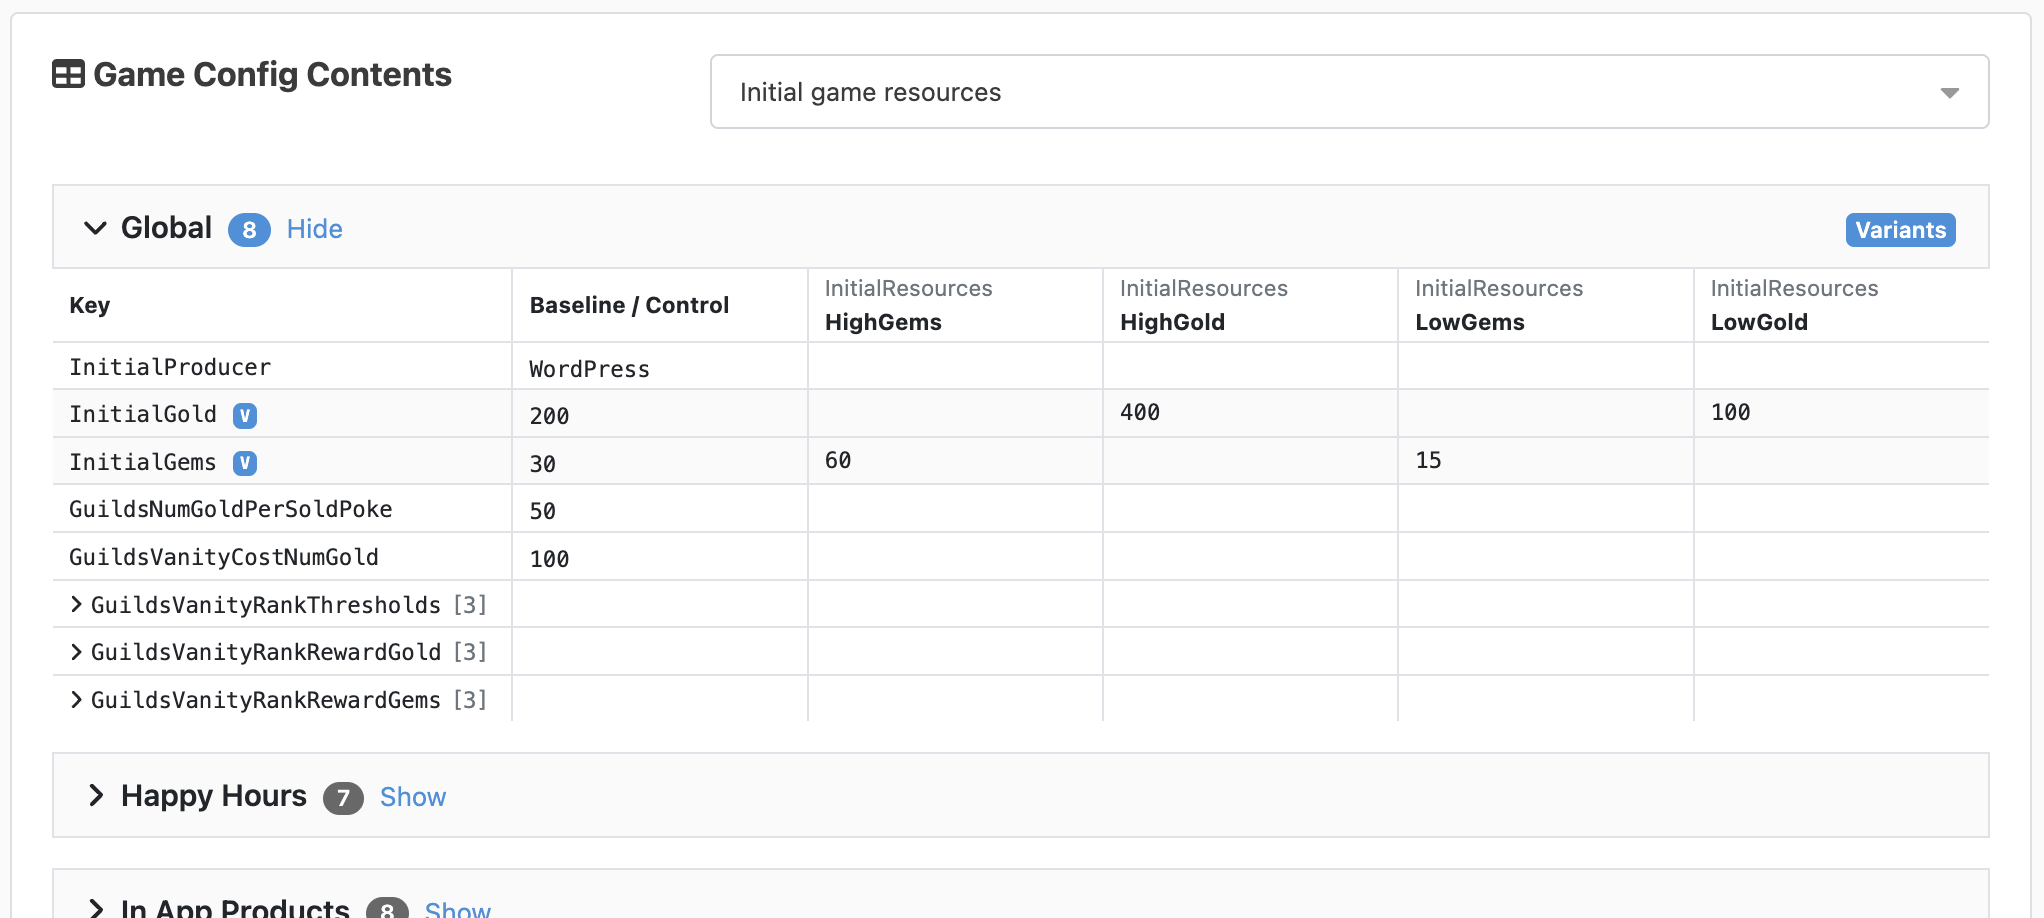
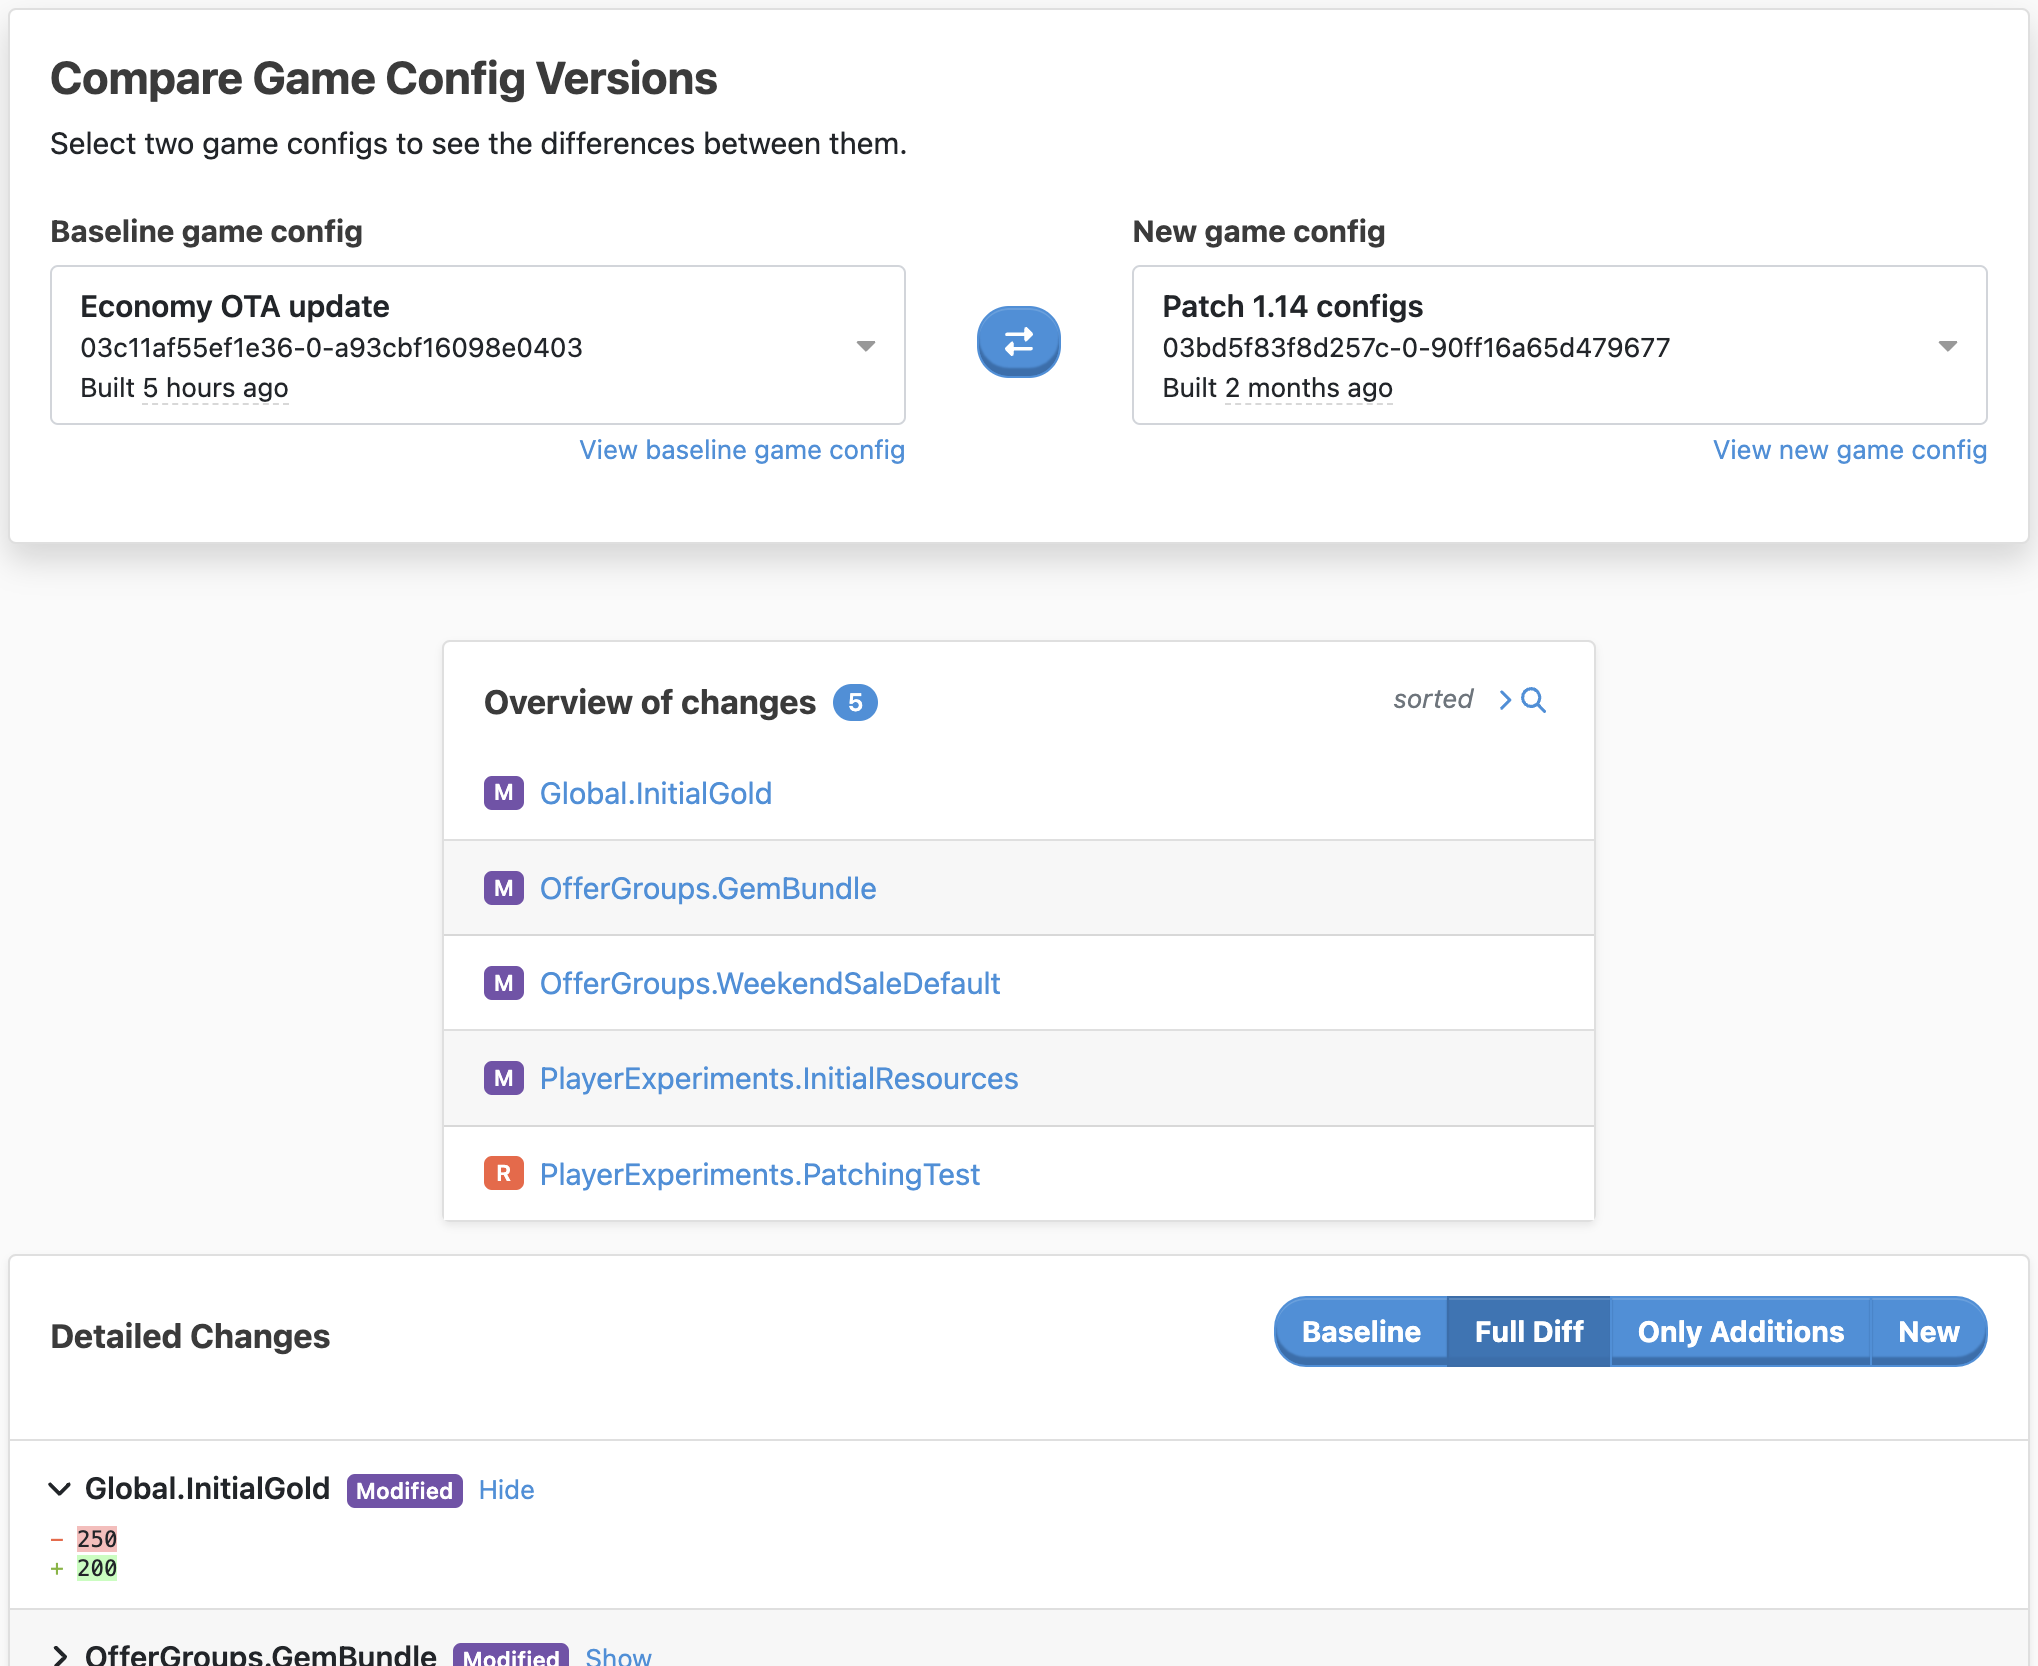
The details view of a game config in the LiveOps Dashboard renders the contents of the contained Game Config Items.
By selecting the Upload only setting in the the Game Config Build Window, it will only upload a new Archive to the server without publishing it. With this workflow, you can review your changes in the dashboard before setting them as active.
Game Config content can be conveniently compared to the currently active one in the LiveOps Dashboard either by clicking on the "binoculars" icon in the list view or the View Diffs button in the details view.
After reviewing the uploaded Archive, you can manually publish it:
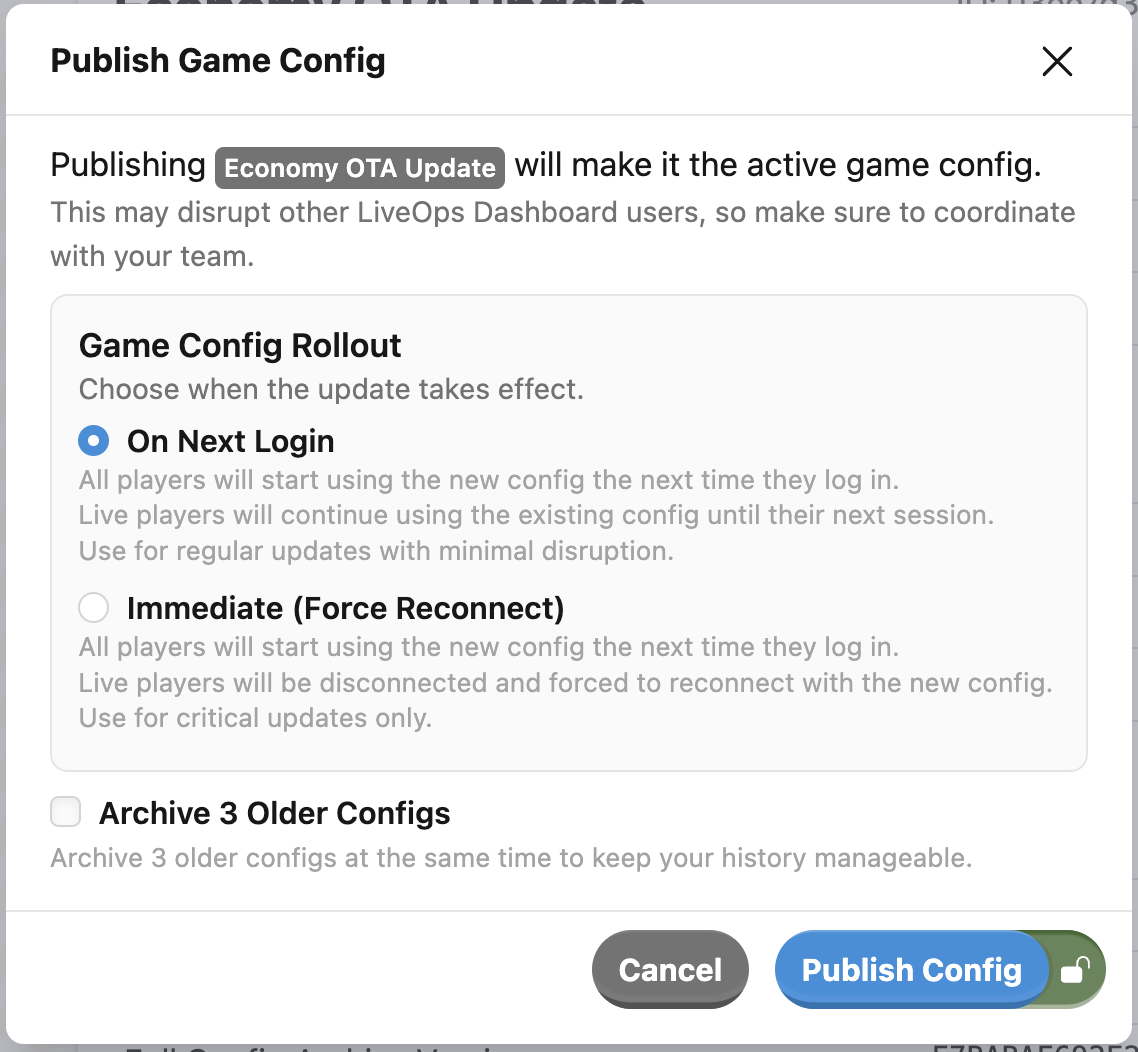
After publishing the Game Config, any new clients connecting to the server will use the new Game Config. All already connected clients however will keep using the version of the Game Configs they negotiated at when they connected to the server.
This means game config updates do not interfere with any ongoing game sessions, but it also means that not all the players are necessarily using the same version of the game configs. This needs to be taken into account when players are interacting in a multiplayer game.
Config Changes and Server Updates
In addition to game configs uploaded via the HTTP API, the server will persist and publish game configs from disk on startup if it determines that the config found on disk is newer than the currently active config.
In order to update GameConfig and the Game Server at the same time, you can build the Configs locally and push the generated StaticGameConfig.mpa file to the source control in the branch where you're planning on deploying the update from. Then, when you deploy an update in that environment, the server will automatically pick up the new Config from the branch you are deploying.
Audit Log Tracking
Whenever a user uploads, publishes, or edits an Archive through the LiveOps Dashboard, they leave a trail in the audit log. This helps you to track and understand changes to your game configs. For more information see LiveOps Dashboard Audit Logs
After you set a Game Config Library, designers can iterate on it by editing the config data, adding Items in their preferred tool, and triggering the build step. You can also test it locally before publishing it to the server and setting it as active.
Game configs should be treated as immutable after they are loaded. To enforce this at compile time, use properties with private setters and IReadOnlyList<> for collections.
Here's an example of a config item using read-only patterns:
[MetaSerializable]
public class TroopInfo : IGameConfigData<TroopKind>
{
    // All members should make their setters private.
    [MetaMember(1)] public TroopKind             Kind      { get; private set; }
    // Use the safe IReadOnlyList<T> for collections.
    [MetaMember(5)] public IReadOnlyList<string> Abilities { get; private set; }

    public TroopKind ConfigKey => Kind;
}
For collections, prefer IReadOnlyList<T> over T[] or List<T>:
| Mutable Type | Read-Only Alternative | Backing store |
|---|---|---|
T[] | IReadOnlyList<T> | T[] (array) |
List<T> | IReadOnlyList<T> | T[] (array) |
The config parser will automatically populate these read-only interfaces from the source data. Using read-only types provides compile-time safety against accidental mutations, helping prevent bugs that could cause non-deterministic behavior or affect other players.
After getting the basics of game configs down, here are some places you can go next: